In the eighth part of this tutorial series on developing PHP on Docker we will take a look on the Google Cloud Platform (GCP) and create a Compute Instance VM to run dockerized applications. This includes:
- creating VMs
- using a container registry
- using a secret manager
All code samples are publicly available in my
Docker PHP Tutorial repository on Github.
You find the branch with the final result of this tutorial at
part-8-gcp-compute-instance-vm-docker.
All published parts of the Docker PHP Tutorial are collected under a dedicated page at Docker PHP Tutorial. The previous part was Create a CI pipeline for dockerized PHP Apps. and the following one is Deploy dockerized PHP Apps to production on GCP via docker compose.
If you want to follow along, please subscribe to the RSS feed or via email to get automatic notifications when the next part comes out :)
Table of contents
- Introduction
- Set up a GCP project
- Create a service account
- Set up the
gcloudCLI tool - Set up the Container Registry
- Set up the Secret Manager
- Compute Instances: The GCP VMs
- Provision the VM
- Automate via
gcloudcommands - Putting it all together
- Cleanup
- Wrapping up
Introduction
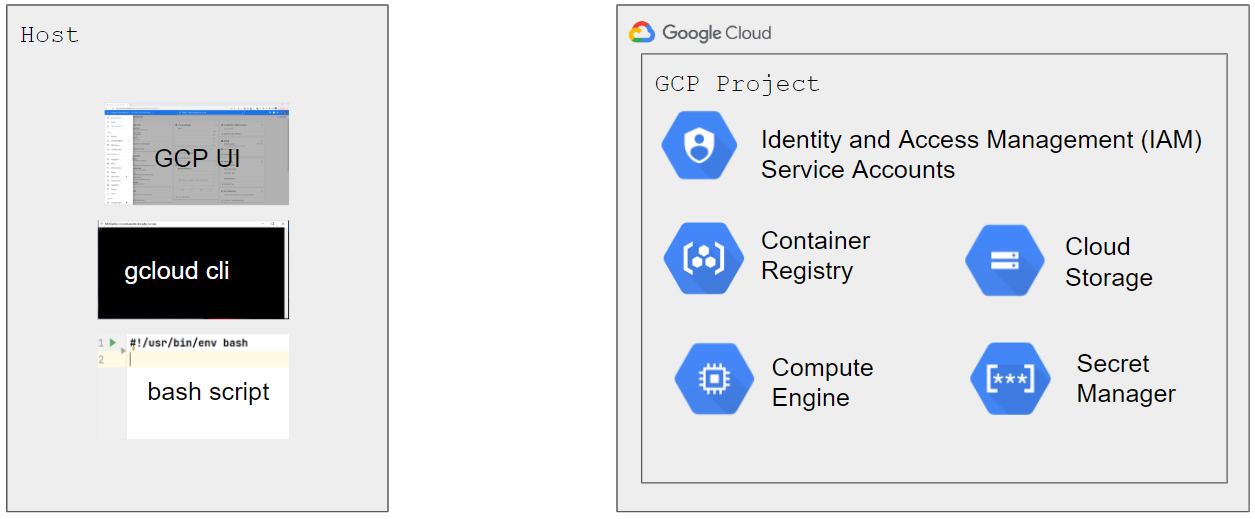
In the next tutorial we will deploy our dockerized PHP Apps to "production" via docker compose and will create this "production" environment on GCP (Google Cloud Platform). This tutorial serves as a primer on GCP to build up some fundamental knowledge, because we will use the platform to provide all the infrastructure required to run our dockerized PHP application.
In the process, we'll learn about GCP projects as our own "space"
in GCP and service accounts as a way to communicate
programmatically. We'll start by doing everything manually via the UI, but will also
explain how to do it programmatically via the gcloud cli and
end with a fully automated script.
The following video shows the overall flow
The API keys (see service account key files) that I use are not in the repository, because I would be billed for any usage. I.e. you must create you own project and keys to follow along.
But you should still know about that upfront and make sure to shut everything down / delete everything in case you're trying it out yourself. The "safest" way to do so is Shutting down (deleting) the whole project
Set up a GCP project
On GCP, resources are organized under so-called projects. We can create a project via the Create Project UI:
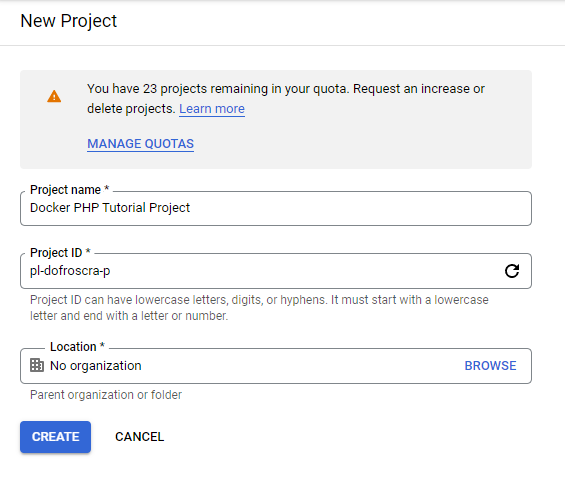
The project ID must be a globally unique string, and I have chosen pl-dofroscra-p for this
tutorial (pl => Pascal Landau; dofroscra => Docker From Scratch; p => production).
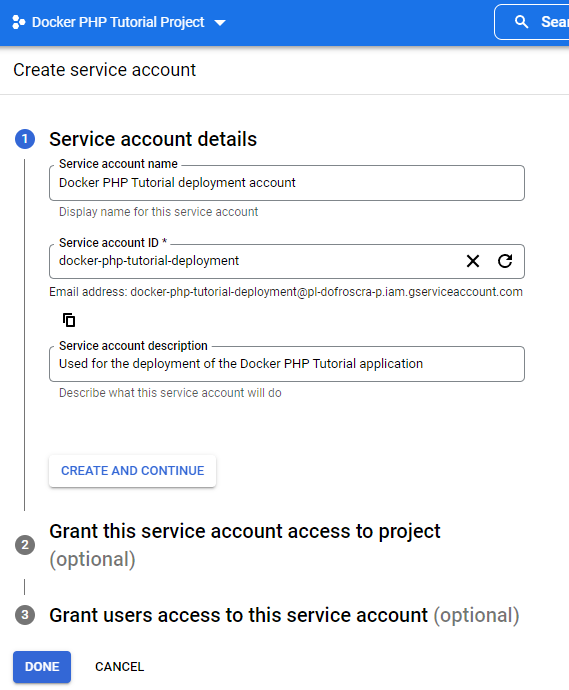
Create a service account
As a next step, we need a service account that we can use to make API requests, because we don't want to use our "personal GCP account". Service accounts are created via the IAM & Admin > Service Accounts UI:
Create service account key file
In order to use the account programmatically, we also need to create a key file by choosing the "Manage Keys" option of the corresponding service account.

This will open up a UI at
https://console.cloud.google.com/iam-admin/serviceaccounts/details/$serviceAccountId/keys
where $serviceAccountId is the numeric id of the service account, e.g. 109548647107864470967.
To create a key:
- click
"ADD KEY"and select"Create new key"from the drop down menu- This will bring up a modal window to choose the key type.
- select the recommended JSON type and click
"Create".- GCP will then generate a new key pair, store the public key and offer the private key file as download.
- download the file and make sure to treat it like any other private key (ssh, gpg, ...) i.e. never share it publicly!
We will store this file in the root of the codebase at gcp-service-account-key.json and add it
to the .gitignore file.
Each service account has also a unique email address that consists of its (non-numeric) id
and the project id. You can also find it directly in the key file:
$ grep "email" ./gcp-service-account-key.json
  "client_email": "docker-php-tutorial-deployment@pl-dofroscra-p.iam.gserviceaccount.com",
This email address is usually used to reference the service account, e.g. when assigning IAM permissions.
Configure IAM permissions
IAM stands for Identity and Access Management (IAM) and is used for managing permissions on GCP. The two core concepts are "permissions" and "roles":
- permissions are fine-grained for particular actions, e.g.
storage.buckets.createto "Create Cloud Storage buckets" - roles combine a selection of permissions, e.g. the
Cloud Storage Adminrole has permissions likestorage.buckets.createstorage.buckets.get- etc.
- roles are assigned to users (or service accounts)
You can find a full overview of all permissions in the Permissions Reference and all roles under Understanding roles > Predefined roles.
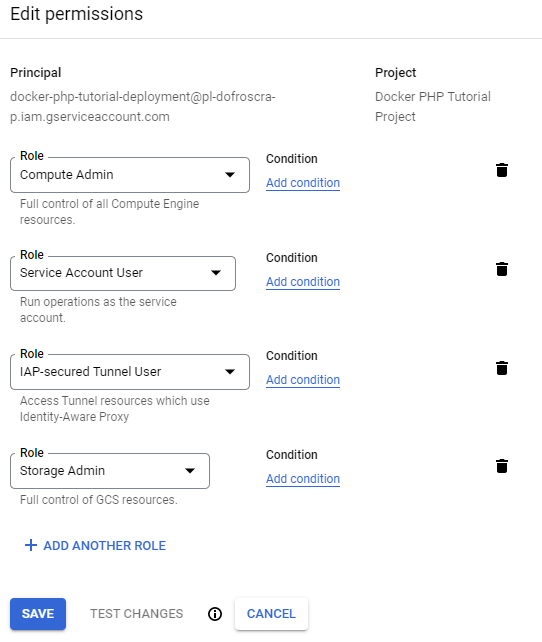
For this tutorial, we'll assign the following roles to the service account "user"
docker-php-tutorial-deployment@pl-dofroscra-p.iam.gserviceaccount.com:
Storage Admin- required to create the GCP bucket for the registry and to pull the images on the VM
Secret Manager Admin- required to retrieve secrets from the Secret Manager
Compute Admin,Service Account UserandIAP-secured Tunnel User- are necessary for logging into a VM via IAP.
Roles can be assigned through the Cloud Console IAM UI by editing the corresponding user.
Caution: It might take some time (usually a couple of seconds) until changes in IAM permissions take effect.
Set up the gcloud CLI tool
The CLI tool for GCP is called gcloud and is
available for all operating systems.
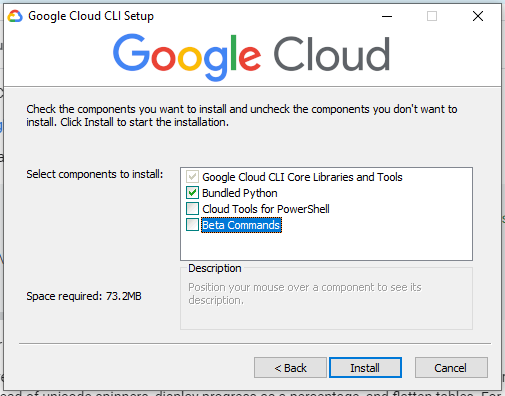
In this tutorial we are using version 380.0.0 installed natively on Windows via the
GoogleCloudSDKInstaller.exe
using the "Bundled Python" option.
FYI: As described under Uninstalling the Google Cloud CLI you can find the installation and config directories via
# installation directory
$ gcloud info --format='value(installation.sdk_root)'
C:\Users\Pascal\AppData\Local\Google\Cloud SDK\google-cloud-sdk

# config directory
$ gcloud info --format='value(config.paths.global_config_dir)'
C:\Users\Pascal\AppData\Roaming\gcloud
I will not use my personal Google account to run gcloud commands, thus I'm not using the
"usual" initialization process
by running gcloud init. Instead, I will use
the service account that we created previously and activate it as
described under
gcloud auth activate-service-account
via
gcloud auth activate-service-account docker-php-tutorial-deployment@pl-dofroscra-p.iam.gserviceaccount.com --key-file=./gcp-service-account-key.json --project=pl-dofroscra-p
Output
$ gcloud auth activate-service-account docker-php-tutorial-deployment@pl-dofroscra-p.iam.gserviceaccount.com --key-file=./gcp-service-account-key.json --project=pl-dofroscra-p
Activated service account credentials for: [docker-php-tutorial-deployment@pl-dofroscra-p.iam.gserviceaccount.com]
FYI: Because we are using a json key file that includes the service account ID, we can also
omit the id in the command, i.e.
$ gcloud auth activate-service-account --key-file=./gcp-service-account-key.json --project=pl-dofroscra-p
Activated service account credentials for: [docker-php-tutorial-deployment@pl-dofroscra-p.iam.gserviceaccount.com]
Set up the Container Registry
We will use docker compose to run our PHP application in the next tutorial part
and need to make our docker images available in a
container registry.
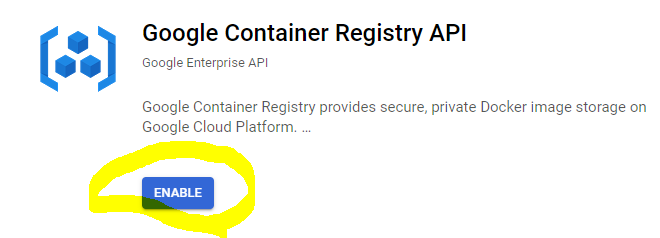
Luckily, GCP offers a Container Registry product
that gives us a ready-to-use private registry as part of a GCP project. Before we can use it,
the corresponding
Google Container Registry API must be enabled:
You find the Container Registry in the Cloud Console UI under Container Registry.
Authenticate docker
Since the Container Registry is private, we need to authenticate before we can push our docker images. The available authentication methods are described in the GCP docu "Container Registry Authentication methods". For pushing images from our local host system, we will use the service account key file that we created previously and run the command shown in the "JSON key file" section of the the docu.
key=./gcp-service-account-key.json
cat "$key" | docker login -u _json_key --password-stdin https://gcr.io
A successful authentication looks as follows:
$ cat "$key" | docker login -u _json_key --password-stdin https://gcr.io
Login Succeeded

Logging in with your password grants your terminal complete access to your account.
For better security, log in with a limited-privilege personal access token. Learn more at https://docs.docker.com/go/access-tokens/
So what exactly "happens" when we run this command? According to the
docker logindocumentation
When you log in, the command stores credentials in
$HOME/.docker/config.jsonon Linux or%USERPROFILE%/.docker/config.jsonon Windows [...]The Docker Engine can keep user credentials in an external credentials store, such as the native keychain of the operating system. [...]
You need to specify the credentials store in
$HOME/.docker/config.jsonto tell the docker engine to use it. [...]By default, Docker looks for the native binary on each of the platforms, i.e. “osxkeychain” on macOS, “wincred” on windows, and “pass” on Linux.
In other words: I won't be able to see the content of the service account key file in "plain
text" anywhere but docker will utilize the OS specific tools to store them securely. After I ran
the docker login command on Windows, I found the following content in ~/.docker/config.json:
$ cat ~/.docker/config.json
{
        "auths": {
                "gcr.io": {}
        },
        "credsStore": "desktop"
}
FYI: "desktop" seems to be a
wrapper for the Wincred executable.
Pushing images to the registry
For this tutorial, we will create a super simple nginx alpine image that provides a "Hello
world" hello.html file via
docker build -t my-nginx -f - . <<EOF
FROM nginx:1.21.5-alpine

RUN echo "Hello world" >> /usr/share/nginx/html/hello.html

EOF
The name of the image is my-nginx
$ docker image ls | grep my-nginx
my-nginx         latest             42dd1608d126   50 seconds ago    23.5MB
In order to push an image to a registry, the image name must be prefixed with the corresponding registry. This was quite confusing to me, because I would have expected to be able to run something like this:
$ docker push my-nginx --registry=gcr.io

unknown flag: --registry
See 'docker push --help'.
But nope, there is no such --registry option. Even worse: Omitting it would cause a push to
docker.io, the "default" registry:
$ docker push my-nginx
Using default tag: latest
The push refers to repository [docker.io/my-nginx]
According to the GCP docs on Pushing and pulling images, the following steps are necessary to push an image to a GCP registry:
- Tag the image with its target path in Container Registry, including the gcr.io registry host and the project ID my-project
- Push the image to the registry
In our case the target path to our Container Registry is
gcr.io/pl-dofroscra-p
because pl-dofroscra-p is the id of the GCP project we created previously.
The full image name becomes
gcr.io/pl-dofroscra-p/my-nginx
To push the my-nginx image, we must first "add another name" to it via
docker tag
$ docker tag my-nginx gcr.io/pl-dofroscra-p/my-nginx

$ docker image ls
REPOSITORY                       TAG                IMAGE ID       CREATED          SIZE
my-nginx                         latest             ba7a2c5faf0d   15 minutes ago   23.5MB
gcr.io/pl-dofroscra-p/my-nginx   latest             ba7a2c5faf0d   15 minutes ago   23.5MB
and push that name afterwards
$ docker push gcr.io/pl-dofroscra-p/my-nginx
Using default tag: latest
The push refers to repository [gcr.io/pl-dofroscra-p/my-nginx]
134174afa9ad: Preparing
cb7b4430c52d: Preparing
419df8b60032: Preparing
0e835d02c1b5: Preparing
5ee3266a70bd: Preparing
3f87f0a06073: Preparing
1c9c1e42aafa: Preparing
8d3ac3489996: Preparing
8d3ac3489996: Waiting
3f87f0a06073: Waiting
1c9c1e42aafa: Waiting
cb7b4430c52d: Pushed
134174afa9ad: Pushed
419df8b60032: Pushed
5ee3266a70bd: Pushed
0e835d02c1b5: Pushed
8d3ac3489996: Layer already exists
3f87f0a06073: Pushed
1c9c1e42aafa: Pushed
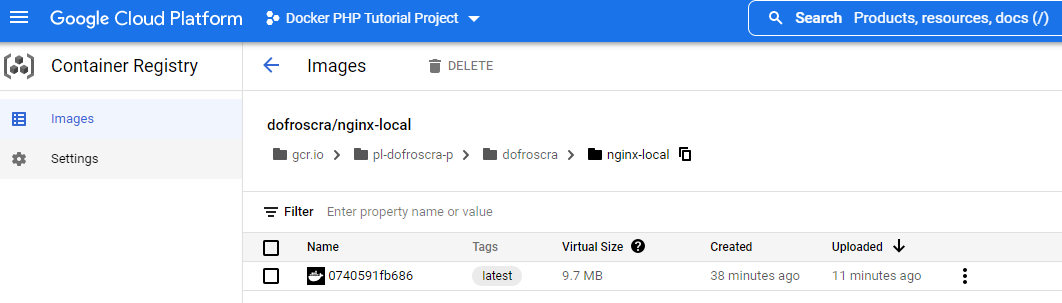
latest: digest: sha256:0740591fb686227d8cdf4e42b784f634cbaf9f5caa6ee478e3bcc24aeef75d7f size: 1982
You can then find the image in the UI of the Container Registry:
Don't worry: We won't have to do the tagging every time before a push, because we will
set up make to use the correct name automatically
when building the images in the next part.
Images are stored in Google Cloud Storage buckets
We assigned the Storage Admin role to the service account previously
that contains the storage.buckets.create permission. If we wouldn't have done that, the
following error would have occurred:
denied: Token exchange failed for project 'pl-dofroscra-p'. Caller does not have permission 'storage.buckets.create'. To configure permissions, follow instructions at: https://cloud.google.com/container-registry/docs/access-control
The Container Registry tries to store the docker images in a Google Cloud Storage bucket that is created on the fly when the very first image is pushed, see the GCP docs on "Adding a registry":
The first image push to a hostname triggers creation of the registry in a project and the corresponding Cloud Storage storage bucket. This initial push requires project-wide permissions to create storage buckets.
You can find the bucket, that in my case is named artifacts.pl-dofroscra-p.appspot.com
in the Cloud Storage UI:
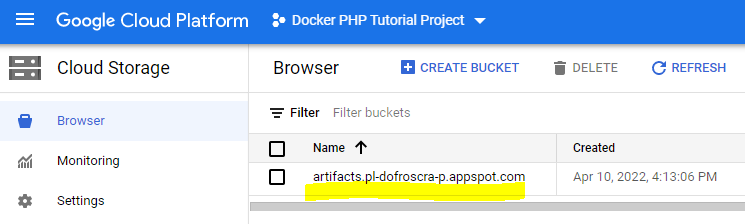
CAUTION: Make sure to delete this bucket once you are done with the tutorial - otherwise storage costs will incur.
Pulling images from the registry
According to the
GCP docs to pull an image from the Container Registry
we need to be authenticated with a user that
has the permissions of the
Storage Object Viewer
role to access the "raw" images. FYI: The Storage Admin role that we assigned previously has all
the permissions of the Storage Object Viewer role.
Then use the fully qualified image name as before:
docker pull gcr.io/pl-dofroscra-p/my-nginx
Output if the image is cached
$ docker pull gcr.io/pl-dofroscra-p/my-nginx
Using default tag: latest
latest: Pulling from pl-dofroscra-p/my-nginx
Digest: sha256:0740591fb686227d8cdf4e42b784f634cbaf9f5caa6ee478e3bcc24aeef75d7f
Status: Image is up to date for gcr.io/pl-dofroscra-p/my-nginx:latest
gcr.io/pl-dofroscra-p/my-nginx:latest
or if doesn't exist
docker pull gcr.io/pl-dofroscra-p/my-nginx
Using default tag: latest
latest: Pulling from pl-dofroscra-p/my-nginx
59bf1c3509f3: Pull complete
f3322597df46: Pull complete
d09cf91cabdc: Pull complete
3a97535ac2ef: Pull complete
919ade35f869: Pull complete
40e5d2fe5bcd: Pull complete
c72acb0c83a5: Pull complete
d6baa2bee4a5: Pull complete
Digest: sha256:0740591fb686227d8cdf4e42b784f634cbaf9f5caa6ee478e3bcc24aeef75d7f
Status: Downloaded newer image for gcr.io/pl-dofroscra-p/my-nginx:latest
gcr.io/pl-dofroscra-p/my-nginx:latest
Set up the Secret Manager
Even though
we use git secret to manage our secrets, we
still need the gpg secret key for decryption. This key is "a secret in itself" and we will use
the GCP Secret Manager to store it and
retrieve it later from a VM.
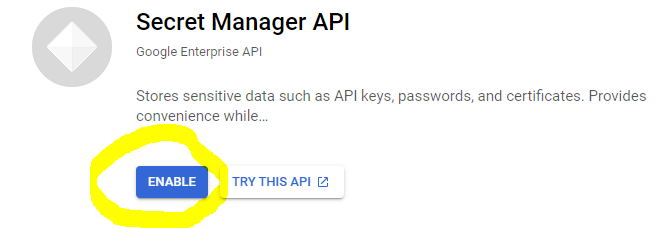
It can be managed from the Security > Secret Manager UI once we have enabled the Secret Manager API
Create a secret via the UI
To create a secret:
- navigate to the Secret Manager UI
and click the
"+ CREATE SECRET"button - enter the secret name and secret value in the form (we can ignore the other advanced
settings like "Replication policy" and "Encryption" for now)
- FYI: the secret name can only contain English letters (A-Z), numbers (0-9), dashes (-), and underscores (_)
- click the
"CREATE SECRET"button
The following gif shows the creation of a secret named my_secret_key with the value
my_secret_value.
View a secret via the UI
The Security > Secret Manager UI lists all existing secrets. Clicking on a secret will lead you to the Secret Detail UI at the URL
https://console.cloud.google.com/security/secret-manager/secret/$secretName/versions
e.g. for secret name my_secret_key:
https://console.cloud.google.com/security/secret-manager/secret/my_secret_key/versions
The UI shows all versions of the secret, though we currently only have one. To view the actual secret value, click on the three dots in the "Actions" column and select "View secret value" (see gif in the previous section).
Retrieve a secret via the gcloud cli
To retrieve a secret with a service account via the gcloud cli, it needs the permission
secretmanager.versions.access, that is part of the
Secret Manager Secret Accessor
role (as well as the Secret Manager Admin role). Let's first show all available secrets via
gcloud secrets list
$ gcloud secrets list
NAME           CREATED              REPLICATION_POLICY  LOCATIONS
my_secret_key  2022-05-15T05:38:11  automatic           -
To "see" the value of my_secret_key, we must also define the corresponding version. All
versions can be listed via
gcloud secrets versions list my_secret_key
$ gcloud secrets versions list my_secret_key
NAME  STATE    CREATED              DESTROYED
1     enabled  2022-05-15T05:38:13  -
The actual secret value for version 1 of my_secret_key is accessed via
gcloud secrets versions access 1 --secret=my_secret_key
$ gcloud secrets versions access 1 --secret=my_secret_key
my_secret_value
You can also use
the string latest as version to retrieve the latest enabled version
Version resource - Numeric secret version to access or a configured alias (including 'latest' to use the latest version).
gcloud secrets versions access latest --secret=my_secret_key
$ gcloud secrets versions access latest --secret=my_secret_key
my_secret_value
Add the secret gpg key and password
We already know how to
create another gpg key pair
and
add the corresponding email to git secret
from when we have set up the CI pipelines (see section
Add a password-protected secret gpg key)
. We will do the same once more for the production environment via
name="Production Deployment"
email="[email protected]"
passphrase=87654321
secret=secret-production-protected.gpg.example
public=.dev/gpg-keys/production-public.gpg
# export key pair
gpg --batch --gen-key <<EOF
Key-Type: 1
Key-Length: 2048
Subkey-Type: 1
Subkey-Length: 2048
Name-Real: $name
Name-Email: $email
Expire-Date: 0
Passphrase: $passphrase
EOF

# export the private key
gpg --output $secret --pinentry-mode=loopback --passphrase  "$passphrase" --armor --export-secret-key $email

# export the public key
gpg --armor --export $email > $public
You can find the secret key in the codebase at secret-production-protected.gpg.example
and the public key at .dev/gpg-keys/production-public.gpg.
I have also added the secret gpg key and password as secrets to the secret manager

Compute Instances: The GCP VMs
Compute Instances are the equivalent of AWS EC2 instances.
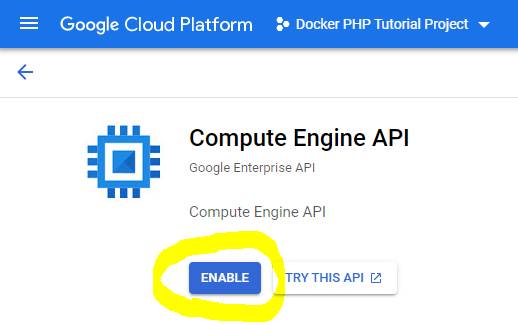
To run our application, we need a VM with a public IP address so that it can be reached from the internet. VMs on GCP are called Compute Instances and can be managed from the Compute Instance UI - though we must first activate the Compute Instance API.
Create a VM
We can simply create a new instance from the Create an instance UI.
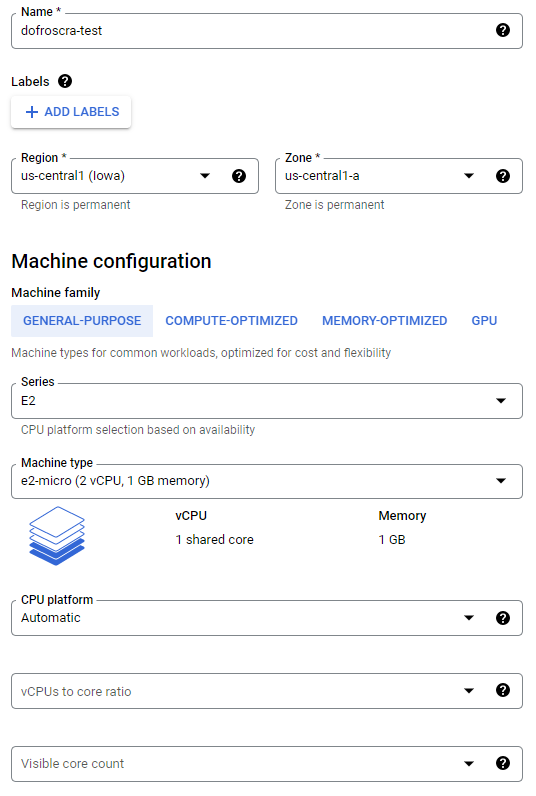
General VM settings
We'll use the following settings:
- Name:
dofroscra-test - Region
us-central1 (Iowa)and Zoneus-central1-a - Machine family:
General Purpose > E2 > e2-micro (2 vCPU, 1 GB memory) - Boot Disk: Debian GNU/Linux 11 (bullseye); 10 GB
- Identity and API access: Choose the "Docker PHP Tutorial deployment account" service account that we created previously
- Firewall: Allow HTTP traffic

Firewall and networks tags
Ticking the Allow HTTP traffic checkbox will cause two things when the instance is created:
- a new firewall rule named
default-allow-httpis created that allows incoming traffic from port80and is only applied to instances with the network taghttp-server. You can see the new rule in the Firewall UI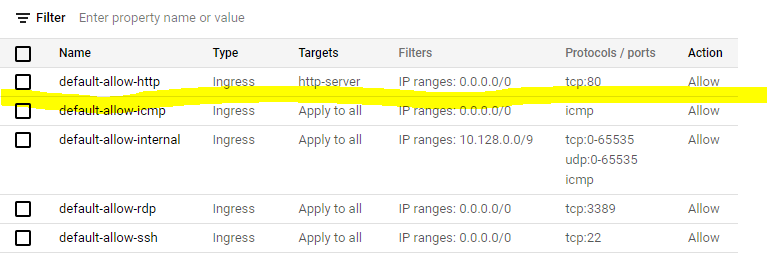
- the network tag
http-serveris added to the instance, effectively enabling the aforementioned firewall rule for the instance
The role of the service account
The service account that we have chosen in the previous step will be attached to the
Compute Instance. I.e. it will be available on the instance and we will have access to the
account when we log into the instance. Conveniently,
thegcloud cli is pre-installed on every Compute Instance:
If you're using an instance on Compute Engine, the gcloud CLI is installed by default.

The exact rules for what the service account can do are described in the Compute Engine docs for "Service accounts". In short: The possible actions will be constrained by the IAM permissions of the service account and the Access scopes of the Compute Instance which are set as outlined in the "Default scopes" section. Just take this as an aside, we won't have to modify anything here.
We will use the service account later,
when we log into the Compute Instance and run docker pull from there
to pull images from the registry.
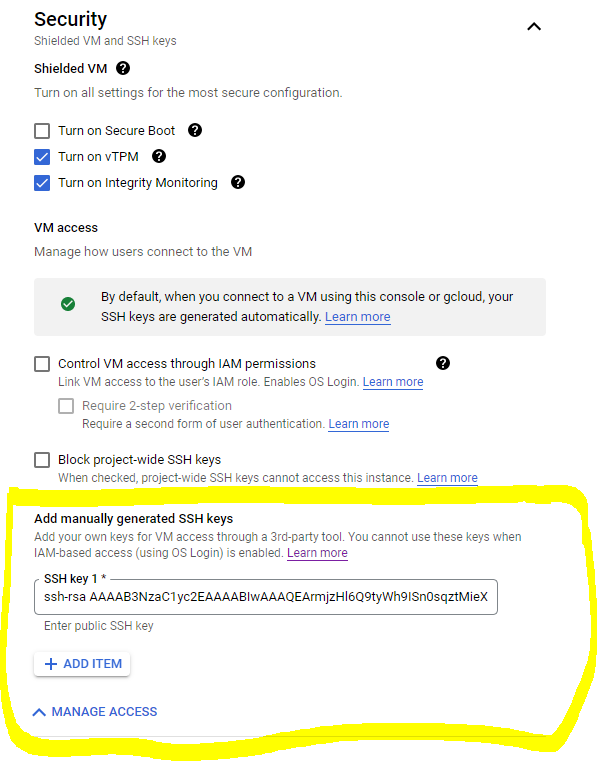
Adding a public SSH key
In addition, I added my own public ssh key
ssh-rsa AAAAB3NzaC1yc2....6row== pascal.landau@MY_LAPTOP
CAUTION: The username for this key will be defined at the end of the key! E.g. in the
example above, the username would be pascal.landau. This is important for
logging in later via SSH from your local machine.
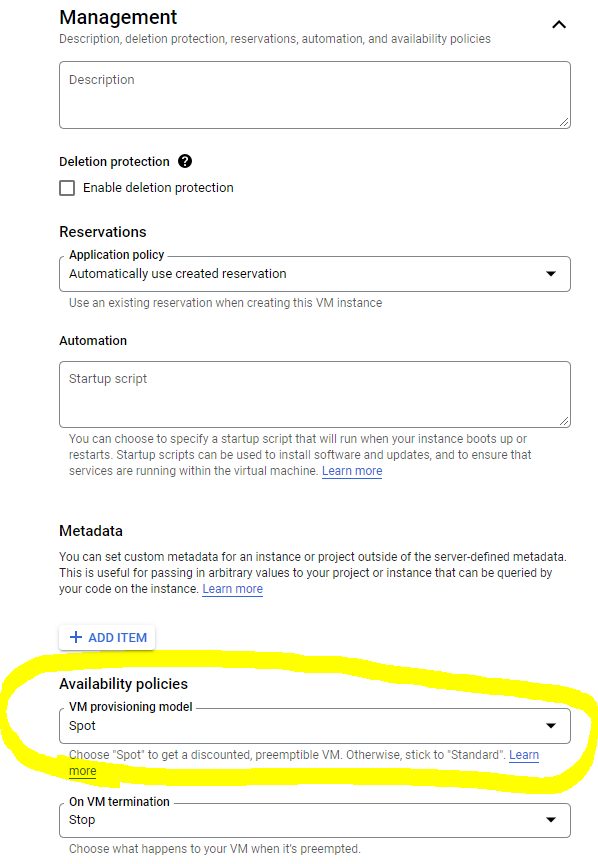
Define Availability Policies
We will make the instance preemptible,
by choosing the VM provisioning model Spot.
This makes it much cheaper but GCP "might" terminate the instance randomly if the
capacity is needed somewhere else (and definitely after 24 hours). This is completely fine for our
test use case. The final costs are ~2$ per month for this instance.
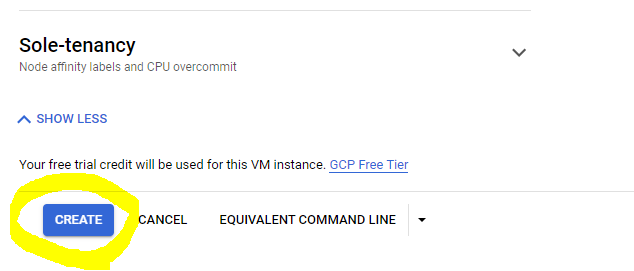
The actual VM creation
Finally, click the "Create" button at the bottom of the page
Once the instance is created, you can see it in the Compute Instances > VM instances UI
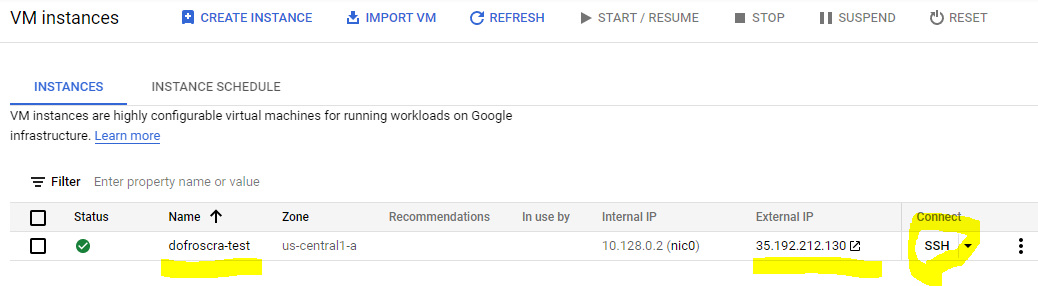
Next to the instance name dofroscra-test we can see the external IP address 35.192.212.130
Opening it in a browser via http://35.192.212.130/ won't show anything though, because we
didn't deploy the application yet.
CAUTION: Make sure to shutdown and remove this instance by the end of the tutorial - otherwise compute costs will incur.
Log into a VM
There are multiple ways to log into the VM / Compute Instance outlined in Connecting to Linux VMs using advanced methods.
I'm going to describe three of them:
- Login via SSH from the GCP UI
- Login via SSH with your own key from your host machine
- Login using the Identity-Aware Proxy (IAP) concept
PS: It's worth keeping the Troubleshooting SSH guide as a bookmark.
Login via SSH from the GCP UI
Probably the easiest way to log in: Simply click the "SSH" button in the
Compute Instances > VM instances UI next
to the instance you want to log in. This will create a web shell that uses an ephemeral SSH key
according to the GCP documentation: Connect to Linux VMs > Connect to VMs
When you connect to VMs using the Cloud Console, Compute Engine creates an ephemeral SSH key for you.
Login via SSH with your own key from your host machine
This method is probably closest to what you are used to from working with "other" VMs. In this
case, the instance has to be publicly available (i.e. reachable "from the internet") and
expose a port for SSH connections (usually 22). In addition, your public SSH key needs to be
deployed.
All of those requirements are true for the Compute Instance that we just created:
- the public ip address is
35.192.212.130 - port
22is open by default via thedefault-allow-sshfirewall rule, see How to Configure Firewall Rules in Google Cloud Platform and the official documentation on Troubleshooting SSH > By default, Compute Engine VMs allow SSH access on port 22. - we added our public SSH key using
pascal.landauas the username
So we can now simply login via
ssh [email protected]
or if you need to specify the location of the private key via the -i option
ssh -i ~/.ssh/id_rsa [email protected]
$ ssh [email protected]
Linux dofroscra-test 4.19.0-20-cloud-amd64 #1 SMP Debian 4.19.235-1 (2022-03-17) x86_64

The programs included with the Debian GNU/Linux system are free software;
the exact distribution terms for each program are described in the
individual files in /usr/share/doc/*/copyright.

Debian GNU/Linux comes with ABSOLUTELY NO WARRANTY, to the extent
permitted by applicable law.
Last login: Sun Apr 10 16:21:00 2022 from 54.74.228.207
pascal.landau@dofroscra-test:~$
Login using the Identity-Aware Proxy (IAP) concept
Note: This is the preferred way of logging into a GCP VM
To login via IAP we need the gcloud CLI that will use API
requests (via HTTPS) under the hood to authenticate the Google user (or in our case: the
service account) and then proxy the requests to the VM via
GCP's Identity-Aware Proxy (IAP)
as described in
Connecting through Identity-Aware Proxy (IAP) for TCP
and in more detail under
Using IAP for TCP forwarding > Tunneling SSH connections.
The corresponding command is
gcloud compute ssh, e.g.:
gcloud compute ssh dofroscra-test --zone us-central1-a --tunnel-through-iap --project=pl-dofroscra-p
Note the
--tunnel-through-iap
flag: Without it, gcloud would instead attempt to use a "normal" ssh connection if the VM is
publicly reachable
as per docu:
If the instance doesn't have an external IP address, the connection automatically uses IAP TCP tunneling. If the instance does have an external IP address, the connection uses the external IP address instead of IAP TCP tunneling.
Output
$ gcloud compute ssh dofroscra-test --zone us-central1-a --tunnel-through-iap --project=pl-dofroscra-p
WARNING: The private SSH key file for gcloud does not exist.
WARNING: The public SSH key file for gcloud does not exist.
WARNING: The PuTTY PPK SSH key file for gcloud does not exist.
WARNING: You do not have an SSH key for gcloud.
WARNING: SSH keygen will be executed to generate a key.
Updating project ssh metadata...
..............................................Updated [https://www.googleapis.com/compute/v1/projects/pl-dofroscra-p].
.done.
Waiting for SSH key to propagate.
Under the hood, this command will automatically create an SSH key pair on your local machine under
~/.ssh/ named google_compute_engine (unless they already exist) and upload the public key
to the instance.
$ ls -l ~/.ssh/ | grep google_compute_engine
-rw-r--r-- 1 Pascal 197121 1675 Apr 11 09:25 google_compute_engine
-rw-r--r-- 1 Pascal 197121 1456 Apr 11 09:25 google_compute_engine.ppk
-rw-r--r-- 1 Pascal 197121  420 Apr 11 09:25 google_compute_engine.pub
It also opens a Putty session and logs you into in the instance:
Using username "Pascal".
Authenticating with public key "LAPTOP-0DNL2Q02\Pascal@LAPTOP-0DNL2Q02"
Linux dofroscra-test 4.19.0-20-cloud-amd64 #1 SMP Debian 4.19.235-1 (2022-03-17) x86_64

The programs included with the Debian GNU/Linux system are free software;
the exact distribution terms for each program are described in the
individual files in /usr/share/doc/*/copyright.

Debian GNU/Linux comes with ABSOLUTELY NO WARRANTY, to the extent
permitted by applicable law.
Last login: Mon Apr 11 07:22:32 2022 from 54.74.228.207
Pascal@dofroscra-test:~$
Caution: The Putty session will be closed automatically when you abort the original
gcloud compute ssh command!
Additional notes on IAP
In order to enable SSH connections via IAP, our service account needs the following IAM roles:
roles/compute.instanceAdmin.v1, role:Compute Adminroles/iam.serviceAccountUser, role:Service Account Userroles/iap.tunnelResourceAccessor, role:IAP-secured Tunnel User
Otherwise, you might run into a couple of errors like:
ERROR: (gcloud.compute.ssh) Could not fetch resource:
 - Required 'compute.instances.get' permission for 'projects/pl-dofroscra-p/zones/us-central1-a/instances/dofroscra-test'
(roles/compute.instanceAdmin.v1 missing)
ERROR: (gcloud.compute.ssh) Could not add SSH key to instance metadata:
 - The user does not have access to service account 'docker-php-tutorial-deployment@pl-dofroscra-p.iam.gserviceaccount.com'.  User: 'docker-php-tutorial-deployment@pl-dofroscra-p.iam.gserviceaccount.com'.  Ask a project owner to grant you the iam.serviceAccountUser role on the service account
(roles/iam.serviceAccountUser missing)
Remote side unexpectedly closed connection
(roles/iap.tunnelResourceAccessor missing)
Note: This error can also occur if you try to use IAP directly after starting a VM. In this case wait a couple of seconds and try again.
The general "flow" looks like this
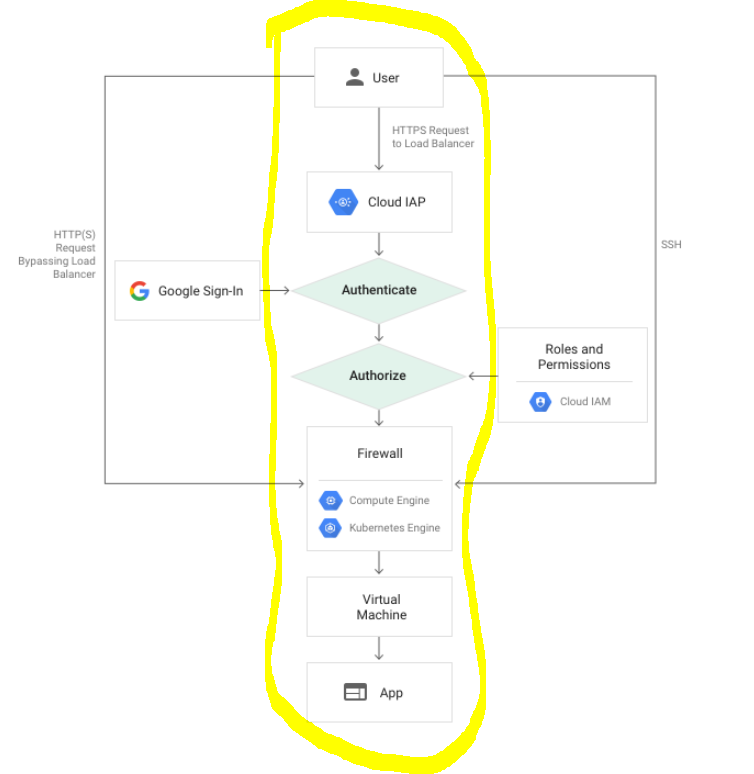
Using IAP might look overly complicated at first, but it offers a number of benefits:
- we can leverage Google's authentication system and the powerful IAM permission management to manage permissions - no more need to deploy custom SSH keys to the VMs
we don't need a public IP address any longer, see Overview of TCP forwarding > How IAP's TCP forwarding works
A special case, establishing an SSH connection using
gcloud compute sshwraps the SSH connection inside HTTPS and forwards it to the remote instance without the need of a listening port on local host.[...]
TCP forwarding with IAP doesn't require a public, routable IP address assigned to your resource. Instead, it uses internal IPs.
This is nice, because in our final PHP application only the
nginxcontainer should be accessible publicly -php-fpmand thephp-workersshouldn't. Usually we would use a
so-called Bastion Host or Jump Box to deal with this problem, but thanks to IAP we don't have to
Additional resources
- Accessing Secure Servers Using IAP
- Connecting Securely to Google Compute Engine VMs without a Public IP or VPN
Get root permissions
The group
google-sudoers exists on each GCP Compute Instance.
It is configured for passwordless sudo via /etc/sudoers.d/google_sudoers
$ sudo cat /etc/sudoers.d/google_sudoers
%google-sudoers ALL=(ALL:ALL) NOPASSWD:ALL
I.e. each user added to this group can use sudo without password or simply run sudo -i to
become root. Your user should be added automatically to that group. This can be verified with
the id command (run on the VM)
Pascal@dofroscra-test:~$ id
uid=1002(Pascal) gid=1003(Pascal) groups=1003(Pascal),4(adm),30(dip),44(video),46(plugdev),1000(google-sudoers)

# => 1000(google-sudoers)
ssh and scp commands
It is quite common to copy files from / to a VM and to run commands on it. This is
usually done via ssh and scp. The gcloud cli offers equivalent commands that can also make
use of
the Identity-Aware Proxy (IAP) concept:
gcloud ssh --command=""
Documentation: gcloud ssh --command
Example:
gcloud compute ssh dofroscra-test --zone us-central1-a --tunnel-through-iap --project=pl-dofroscra-p --command="whoami"
Output:
$ gcloud compute ssh dofroscra-test --zone us-central1-a --tunnel-through-iap --project=pl-dofroscra-p --command="whoami"
Pascal
gcloud scp
Documentation: gcloud scp
Example:
gcloud compute scp --zone us-central1-a --tunnel-through-iap --project=pl-dofroscra-p ./local-file1.txt ./local-file2.txt dofroscra-test:tmp/

# ---
echo "1" >> ./local-file1.txt
echo "2" >> ./local-file2.txt
gcloud compute ssh dofroscra-test --zone us-central1-a --tunnel-through-iap --project=pl-dofroscra-p --command="rm -rf ~/test; mkdir -p ~/test"
gcloud compute ssh dofroscra-test --zone us-central1-a --tunnel-through-iap --project=pl-dofroscra-p --command="ls -l ~/test"
gcloud compute scp --zone us-central1-a --tunnel-through-iap --project=pl-dofroscra-p ./local-file1.txt ./local-file2.txt dofroscra-test:test/
gcloud compute ssh dofroscra-test --zone us-central1-a --tunnel-through-iap --project=pl-dofroscra-p --command="ls -l ~/test"
Output:
$ echo "1" >> ./local-file1.txt
$ echo "2" >> ./local-file2.txt
$ gcloud compute ssh dofroscra-test --zone us-central1-a --tunnel-through-iap --project=pl-dofroscra-p --command="ls -l ~/test"
total 0

$ gcloud compute scp --zone us-central1-a --tunnel-through-iap --project=pl-dofroscra-p ./local-file1.txt ./local-file2.txt dofroscra-test:test/
local-file1.txt           | 0 kB |   0.0 kB/s | ETA: 00:00:00 | 100%
local-file2.txt           | 0 kB |   0.0 kB/s | ETA: 00:00:00 | 100%

$ gcloud compute ssh dofroscra-test --zone us-central1-a --tunnel-through-iap --project=pl-dofroscra-p --command="ls -l ~/test"
total 8
-rw-r--r-- 1 Pascal Pascal 4 Jun  2 13:06 local-file1.txt
-rw-r--r-- 1 Pascal Pascal 4 Jun  2 13:06 local-file2.txt
Note: According to the examples in the documentation, it should also be possible to use the
~ to define that the destination on the remote VM is relative to the home directory. However,
this did not work for me, as I kept getting the error
$ gcloud compute scp --zone us-central1-a --tunnel-through-iap --project=pl-dofroscra-p ./local-file1.txt dofroscra-test:~/test
pscp: remote filespec ~/test: not a directory
even though the diretory existed. But removing the ~/ part worked
$ gcloud compute scp --zone us-central1-a --tunnel-through-iap --project=pl-dofroscra-p ./local-file1.txt  dofroscra-test:test/
local-file1.txt           | 0 kB |   0.0 kB/s | ETA: 00:00:00 | 100%
Provision the VM
Get the secret gpg key and password from the Secret Manager
Before we shift our attention to docker, let's quickly deal with the secrets. We won't need them
for this part of the tutorial. but will need the secret gpg key and its password to
decrypt the secrets in the php containers in the next part.
To recap: We have added the them previously and can now
retrieve them as explained under section
Retrieve a secret via the gcloud cli via
gcloud secrets versions access 1 --secret=GPG_KEY > secret.gpg

GPG_PASSWORD=$(gcloud secrets versions access 1 --secret=GPG_PASSWORD)
$ gcloud secrets versions access 1 --secret=GPG_KEY > secret.gpg
$ head secret.gpg
-----BEGIN PGP PRIVATE KEY BLOCK-----

lQPGBGKA1psBCACq5zYDT587CVZEIWXbUplfAGQZOQJALmzErYpTp0jt+rp4vJhR
U5xahy3pqCq81Cnny5YME50ybB3pW/WcHxWLBDo+he8PKeLbp6wFFjJns+3u4opH
9gFMElyHpzTGiDQYfx/CgY2hKz7GSqpjmnOaKxYvGv0EsbZczyHY1WIN/YFzb0tI
tY7J4zTSH05I+aazRdHyn28QcCRcIT9+4q+5Vk8gz8mmgoqVpyeNgQcqJjcd03iP
WUZd1vZCumOvdG5PZNlc/wPFhqLDmYyLmJ7pt5bWIgty9BjYK8Z2NOdUaekqVEJ+
r29HbzwgFLLE2gd52f07h2y2YgMdWdz4FDxVABEBAAH+BwMC9veBYT2oigXxExLl
7fZKVjw02lEr1NpYd5X1ge9WPU/1qumATJWounzciiETpsYGsbPd9zFRJP4E3JZl
sFSh4p0/kXYTuenYD8wgGkeYyN4lm53IHfqSn2z9JMW5Kz9XEODtKJl8fjcn9Zeb

$ GPG_PASSWORD=$(gcloud secrets versions access 1 --secret=GPG_PASSWORD)
$ echo $GPG_PASSWORD
87654321
Installing docker and docker compose
Since we created the VM with a Debian OS, we'll follow the official Debian installation instructions for Docker Engine and run the following commands while we are logged into the VM:
# install required tools
sudo apt-get update -yq && apt-get install -yq \
     ca-certificates \
     curl \
     gnupg \
     lsb-release

# add Docker’s official GPG key
curl -fsSL https://download.docker.com/linux/debian/gpg | sudo gpg --dearmor -o /usr/share/keyrings/docker-archive-keyring.gpg

# set up the stable repository
echo \
 "deb [arch=$(dpkg --print-architecture) signed-by=/usr/share/keyrings/docker-archive-keyring.gpg] https://download.docker.com/linux/debian \
 $(lsb_release -cs) stable" | sudo tee /etc/apt/sources.list.d/docker.list > /dev/null

# install Docker Engine
sudo apt-get update -yq && sudo apt-get install -yq \
     docker-ce \
     docker-ce-cli \
     containerd.io \
     docker-compose-plugin
I have also added these instructions to the script .infrastructure/scripts/provision.sh.
Afterwards we check via
docker --version
docker compose version
if docker and docker compose are available
$ docker --version
Docker version 20.10.15, build fd82621

$ docker compose version
Docker Compose version v2.5.0
Authenticate docker via gcloud
I recommend running the commands as root via
sudo -i
pascal_landau@dofroscra-test:~$ sudo -i
root@dofroscra-test:~#
Otherwise, we might run into docker permission errors like
Got permission denied while trying to connect to the Docker daemon socket at unix:///var/run/docker.sock: Post "http://%2Fvar%2Frun%2Fdocker.sock/v1.24/images/create?fromImage=...": dial unix /var/run/docker.sock: connect: permission denied
FYI: As an alternative we could also add the non-root user to the docker group via
user=$(whoami)
sudo usermod -a -G docker $user
$ user=$(whoami)
$ sudo usermod -a -G docker $user
$ id
uid=1001(pascal_landau) gid=1002(pascal_landau) groups=1002(pascal_landau),4(adm),30(dip),44(video),46(plugdev),997(docker),1000(google-sudoers)
Locally, we could
use the JSON key file of the service account for authentication, but we
don't have access to that key file on the VM. Instead, we will authenticate docker via the
pre-installed gcloud cli and the attached service account
as described in the
GCP docs for the Container Registry Authentication methods under section "gcloud credential helper"
via
gcloud auth configure-docker --quiet
Adding credentials for all GCR repositories.
WARNING: A long list of credential helpers may cause delays running 'docker build'. We recommend passing the registry name to configure only the registry you are using.
Docker configuration file updated.
This creates the file /root/.docker/config.json that we already encountered when we
authenticated docker locally to push images.
In this case it has the following content
$ cat /root/.docker/config.json
{
  "credHelpers": {
    "gcr.io": "gcloud",
    "us.gcr.io": "gcloud",
    "eu.gcr.io": "gcloud",
    "asia.gcr.io": "gcloud",
    "staging-k8s.gcr.io": "gcloud",
    "marketplace.gcr.io": "gcloud"
  }
}
The creadHelpers are described in the docker login docs
Credential helpers are similar to the credential store above, but act as the designated programs to handle credentials for specific registries. The default credential store (credsStore or the config file itself) will not be used for operations concerning credentials of the specified registries.
In other words:
- we are using
gcr.ioas registry - this registry is defined to use the credential helper
gcloud - i.e. it will use the pre-initialized
gcloudcli for authentication
Pulling the nginx image
Once we are authenticated, we can simply run docker pull with the full image name to retrieve the
nginx image that we pushed previously
docker pull gcr.io/pl-dofroscra-p/my-nginx
$ docker pull gcr.io/pl-dofroscra-p/my-nginx
Using default tag: latest
latest: Pulling from pl-dofroscra-p/my-nginx
59bf1c3509f3: Pull complete
f3322597df46: Pull complete
d09cf91cabdc: Pull complete
3a97535ac2ef: Pull complete
919ade35f869: Pull complete
40e5d2fe5bcd: Pull complete
c72acb0c83a5: Pull complete
d6baa2bee4a5: Pull complete
Digest: sha256:0740591fb686227d8cdf4e42b784f634cbaf9f5caa6ee478e3bcc24aeef75d7f
Status: Downloaded newer image for gcr.io/pl-dofroscra-p/my-nginx:latest
gcr.io/pl-dofroscra-p/my-nginx:latest
If we wouldn't be authenticated, we would run into the following error
$ docker pull gcr.io/pl-dofroscra-p/my-nginx
Using default tag: latest
Error response from daemon: unauthorized: You don't have the needed permissions to perform this operation, and you may have invalid credentials. To authenticate your request, follow the steps in: https://cloud.google.com/container-registry/docs/advanced-authentication
Start the nginx container
For now, we will simply run the nginx container with docker run via
docker run --name nginx -p 80:80 --rm -d gcr.io/pl-dofroscra-p/my-nginx:latest
We
- give it the name
nginxso we can easily reference it later via--name nginx - map port
80from the host to port80of the container so that HTTP requests to the VM are handled via the container via-p 80:80, see Docker docs on "Publish or expose port (-p, --expose)" - make it run in the background via
-d(--detach) and remove it after shutdown automatically via-rm(--remove)
Output
root@dofroscra-test:~# docker run -p 80:80 -d --name nginx gcr.io/pl-dofroscra-p/my-nginx:latest
dd49bedad97c06f698d06a140c5091c04ad81b2f75632e222927e7f71cf28c18

root@dofroscra-test:~# docker logs nginx
/docker-entrypoint.sh: /docker-entrypoint.d/ is not empty, will attempt to perform configuration
/docker-entrypoint.sh: Looking for shell scripts in /docker-entrypoint.d/
/docker-entrypoint.sh: Launching /docker-entrypoint.d/10-listen-on-ipv6-by-default.sh
10-listen-on-ipv6-by-default.sh: info: Getting the checksum of /etc/nginx/conf.d/default.conf
10-listen-on-ipv6-by-default.sh: info: /etc/nginx/conf.d/default.conf differs from the packaged version
/docker-entrypoint.sh: Launching /docker-entrypoint.d/20-envsubst-on-templates.sh
/docker-entrypoint.sh: Launching /docker-entrypoint.d/30-tune-worker-processes.sh
/docker-entrypoint.sh: Configuration complete; ready for start up
2022/05/08 12:01:43 [notice] 1#1: using the "epoll" event method
2022/05/08 12:01:43 [notice] 1#1: nginx/1.21.5
2022/05/08 12:01:43 [notice] 1#1: built by gcc 10.3.1 20211027 (Alpine 10.3.1_git20211027)
2022/05/08 12:01:43 [notice] 1#1: OS: Linux 4.19.0-20-cloud-amd64
2022/05/08 12:01:43 [notice] 1#1: getrlimit(RLIMIT_NOFILE): 1048576:1048576
2022/05/08 12:01:43 [notice] 1#1: start worker processes
2022/05/08 12:01:43 [notice] 1#1: start worker process 30
2022/05/08 12:01:43 [notice] 1#1: start worker process 31
We're all set to serve HTTP requests: The requests will be passed to the nginx container
due to the mapped port 80, i.e. we can simply use the public IP address 35.192.212.130 in a
curl request and check
the "Hello world" file we've added to the image:
$ curl -s http://35.192.212.130/hello.html
Hello world
Automate via gcloud commands
So far we have mostly used the UI to configure everything. This is great for understanding how things work, but it's not so great for maintainability:
- UIs change
- "Clicking" stuff takes quite some time
- we can't automate anything
Fortunately, we can also use the gcloud cli for most of the
tasks.
Preconditions: Project and Owner service account
I'll assume that
gcloudis installed- a GCP project exists
In addition, I'll manually create a new "master" service account
and assign it
the role Owner.
We'll use that service account in the gcloud cli to enable all the APIs and manage the
resources.
FYI: We could also do this with our personal GCP user, but I plan to use terraform in a later
tutorial which will require a service account anyway.
We will use docker-php-tutorial-master as service account ID and
store the key file of the account at the root of the
codebase under gcp-master-service-account-key.json (which is also added to the .gitignore file).
Configure gcloud to use the master service account
Run
gcloud auth activate-service-account --key-file=./gcp-master-service-account-key.json --project=pl-dofroscra-p
$ gcloud auth activate-service-account --key-file=./gcp-master-service-account-key.json --project=pl-dofroscra-p
Activated service account credentials for: [docker-php-tutorial-master@pl-dofroscra-p.iam.gserviceaccount.com]
Enable APIs
APIs can be enabled via gcloud services enable $serviceName,
(see also the Docu on "Enabling an API in your Google Cloud project").
The $serviceName is shown on the API overview page of a service, see the following example for
the Container Registry
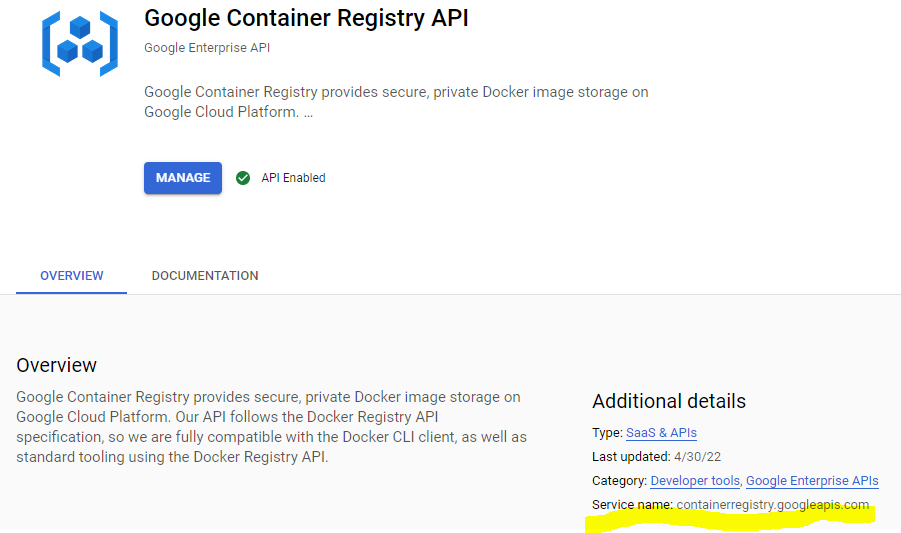
We need the APIs for
- Container Registry:
containerregistry.googleapis.com - Secret Manager:
secretmanager.googleapis.com - Compute Engine:
compute.googleapis.com - IAM:
iam.googleapis.com - Cloud Storage:
storage.googleapis.com - Cloud Resource Manager:
cloudresourcemanager.googleapis.com
gcloud services enable containerregistry.googleapis.com secretmanager.googleapis.com compute.googleapis.com iam.googleapis.com storage.googleapis.com cloudresourcemanager.googleapis.com
$ gcloud services enable containerregistry.googleapis.com secretmanager.googleapis.com compute.googleapis.com iam.googleapis.com storage.googleapis.com cloudresourcemanager.googleapis.com
Operation "operations/acat.p2-386551299607-87333b29-c7eb-40b8-b951-8c86185bbf49" finished successfully.
Create and configure a "deployment" service account
We won't use the master Owner service account for the deployment but create a custom one with
only the necessary permissions.
Service accounts are created via
gcloud iam service-accounts create $serviceAccountId,
(see also the Docu on "Creating and managing service accounts").
The $serviceAccountId is the id of the service account, e.g.
docker-php-tutorial-deployment in our previous example. In
addition, we can define a --description and a --display-name.
gcloud iam service-accounts create docker-php-tutorial-deployment \
  --description="Used for the deployment of the Docker PHP Tutorial application" \
  --display-name="Docker PHP Tutorial Deployment Account"
$ gcloud iam service-accounts create docker-php-tutorial-deployment \
>   --description="Used for the deployment of the Docker PHP Tutorial application" \
>   --display-name="Docker PHP Tutorial Deployment Account"
Created service account [docker-php-tutorial-deployment].
Then, we need a key file for authentication. It can be created via
gcloud iam service-accounts keys create $localPathToKeyFile --iam-account=$serviceAccountEmail
(see also the Docu on "Create and manage service account keys").
The $localPathToKeyFile is used to store the key file locally, e.g.
gcp-service-account-key.json in our previous example and
$serviceAccountEmail is the email address of the service account. It has the form
$serviceAccountId@$projectId.iam.gserviceaccount.com

e.g.

docker-php-tutorial-deployment@pl-dofroscra-p.iam.gserviceaccount.com
Example:
gcloud iam service-accounts keys create ./gcp-service-account-key.json \
  --iam-account=docker-php-tutorial-deployment@pl-dofroscra-p.iam.gserviceaccount.com
$ gcloud iam service-accounts keys create ./gcp-service-account-key.json \
>   --iam-account=docker-php-tutorial-deployment@pl-dofroscra-p.iam.gserviceaccount.com
created key [810df0c6df21de44dc5e431d2b569d74555ba3f9] of type [json] as [./gcp-service-account-key.json] for [docker-php-tutorial-deployment@pl-dofroscra-p.iam.gserviceaccount.com]
Finally, we must assign the required IAM roles via
gcloud projects add-iam-policy-binding $projectName --member=serviceAccount:$serviceAccountEmail --role=$roleId,
(see also the Docu on "Manage access to projects, folders, and organizations").
The $projectName is the name of the GCP project, $serviceAccountEmail the email address
from before and the $roleId the name of the role as listed under
Understanding roles. In our case that's:
- Storage Admin:
roles/storage.admin - Secret Manager Admin:
roles/secretmanager.admin - Compute Admin:
roles/compute.admin - Service Account User:
roles/iam.serviceAccountUser - IAP-secured Tunnel User:
roles/iap.tunnelResourceAccessor
projectName="pl-dofroscra-p"
serviceAccountEmail="docker-php-tutorial-deployment@pl-dofroscra-p.iam.gserviceaccount.com"

gcloud projects add-iam-policy-binding $projectName --member=serviceAccount:$serviceAccountEmail --role=roles/storage.admin
gcloud projects add-iam-policy-binding $projectName --member=serviceAccount:$serviceAccountEmail --role=roles/secretmanager.admin
gcloud projects add-iam-policy-binding $projectName --member=serviceAccount:$serviceAccountEmail --role=roles/compute.admin
gcloud projects add-iam-policy-binding $projectName --member=serviceAccount:$serviceAccountEmail --role=roles/iam.serviceAccountUser
gcloud projects add-iam-policy-binding $projectName --member=serviceAccount:$serviceAccountEmail --role=roles/iap.tunnelResourceAccessor
$ projectName="pl-dofroscra-p"
$ serviceAccountEmail="docker-php-tutorial-deployment@pl-dofroscra-p.iam.gserviceaccount.com"
$ gcloud projects add-iam-policy-binding $projectName --member=serviceAccount:$serviceAccountEmail --role=roles/storage.admin
Updated IAM policy for project [pl-dofroscra-p].
bindings:
- members:
  - serviceAccount:[email protected]
  role: roles/compute.serviceAgent
- members:
  - serviceAccount:[email protected]
  role: roles/containerregistry.ServiceAgent
- members:
  - serviceAccount:[email protected]
  - serviceAccount:[email protected]
  role: roles/editor
- members:
  - serviceAccount:docker-php-tutorial-master@pl-dofroscra-p.iam.gserviceaccount.com
  - user:[email protected]
  role: roles/owner
- members:
  - serviceAccount:[email protected]
  role: roles/pubsub.serviceAgent
- members:
  - serviceAccount:docker-php-tutorial-deployment@pl-dofroscra-p.iam.gserviceaccount.com
  role: roles/storage.admin
etag: BwXgKxHg7gA=
version: 1

# ...

Updated IAM policy for project [pl-dofroscra-p].
bindings:
- members:
  - serviceAccount:docker-php-tutorial-deployment@pl-dofroscra-p.iam.gserviceaccount.com
  role: roles/compute.admin
- members:
  - serviceAccount:[email protected]
  role: roles/compute.serviceAgent
- members:
  - serviceAccount:[email protected]
  role: roles/containerregistry.ServiceAgent
- members:
  - serviceAccount:[email protected]
  - serviceAccount:[email protected]
  role: roles/editor
- members:
  - serviceAccount:docker-php-tutorial-deployment@pl-dofroscra-p.iam.gserviceaccount.com
  role: roles/iam.serviceAccountUser
- members:
  - serviceAccount:docker-php-tutorial-deployment@pl-dofroscra-p.iam.gserviceaccount.com
  role: roles/iap.tunnelResourceAccessor
- members:
  - serviceAccount:docker-php-tutorial-master@pl-dofroscra-p.iam.gserviceaccount.com
  - user:[email protected]
  role: roles/owner
- members:
  - serviceAccount:[email protected]
  role: roles/pubsub.serviceAgent
- members:
  - serviceAccount:docker-php-tutorial-deployment@pl-dofroscra-p.iam.gserviceaccount.com
  role: roles/secretmanager.admin
- members:
  - serviceAccount:docker-php-tutorial-deployment@pl-dofroscra-p.iam.gserviceaccount.com
  role: roles/storage.admin
etag: BwXgKxm0Vtk=
version: 1
Create secrets
Secrets are created via gcloud secrets create $secretId",
(see also the Docu on "Creating and accessing secrets").
The $secretId is the name of the secret, e.g.
my_secret_key in our previous example, and we must also add a
new version with the value of the secret via
gcloud secrets versions add $secretId --data-file="/path/to/file.txt".
gcloud secrets create my_secret_key

echo -n "my_secret_value" | gcloud secrets versions add my_secret_key --data-file=-
$ gcloud secrets create my_secret_key
Created secret [my_secret_key].

$ echo -n "my_secret_value" | gcloud secrets versions add my_secret_key --data-file=-
Created version [1] of the secret [my_secret_key].
We also need to
do the same for the gpg secret key and its password:
gcloud secrets create GPG_KEY
echo gcloud secrets versions add GPG_KEY --data-file=secret-production-protected.gpg.example

gcloud secrets create GPG_PASSWORD
echo -n "87654321" | gcloud secrets versions add GPG_PASSWORD --data-file=-
$ gcloud secrets create GPG_KEY
Created secret [GPG_KEY].
$ gcloud secrets versions add GPG_KEY --data-file=secret-production-protected.gpg.example
Created version [1] of the secret [GPG_KEY].

$ gcloud secrets create GPG_PASSWORD
Created secret [GPG_PASSWORD].
$ echo -n "87654321" | gcloud secrets versions add GPG_PASSWORD --data-file=-
Created version [1] of the secret [GPG_PASSWORD].
Create firewall rule for HTTP traffic
Firewall rules can be created via
gcloud compute firewall-rules create $ruleName
(see also the Docu on "Using firewall rules").
We'll stick to
the same conventions that have been used when creating the VM via the UI
by using default-allow-http as the $ruleName and http-server as the network tag (via the
--target-tags option)
gcloud compute firewall-rules create default-allow-http --allow tcp:80 --target-tags=http-server
$ gcloud compute firewall-rules create default-allow-http --allow tcp:80 --target-tags=http-server
Creating firewall...
..Created [https://www.googleapis.com/compute/v1/projects/pl-dofroscra-p/global/firewalls/default-allow-http].
done.
NAME                NETWORK  DIRECTION  PRIORITY  ALLOW   DENY  DISABLED
default-allow-http  default  INGRESS    1000      tcp:80        False
Create a Compute Instance VM
Compute Instances can be created via
gcloud compute instances create $vmName
(see also the Docu on "Creating and starting a VM instance").
The $vmName defines the name of the VM, e.g.
dofroscra-test in the previous example. In addition, there are a lot of
options to customize the VM, e.g.
--image-familyand--image-project- define the operating system, e.g.
--image-family="debian-11"and--image-project=debian-cloud - See Docu on "Operating system details" for a list of available values
- define the operating system, e.g.
--machine-type- defines the machine type (i.e. the "specs" like CPUs and memory), e.g.
--machine-type=e2-micro - See Docu on "About machine families" that contains links to the machine type categories with the concrete values, e.g. the General-purpose machine family
- defines the machine type (i.e. the "specs" like CPUs and memory), e.g.
- etc.
The docu is doing
a great job at describing all available configuration options. Luckily, we can make our lives a
little easier, configure the VM via UI and then click the "EQUIVALENT COMMAND LINE" button
at the end of the page to get a copy-paste-ready gcloud compute instances create command.
Note that we are using dofroscra-test as the instance name and us-central1-a as the
zone.
gcloud compute instances create dofroscra-test \
    --project=pl-dofroscra-p \
    --zone=us-central1-a \
    --machine-type=e2-micro \
    --network-interface=network-tier=PREMIUM,subnet=default \
    --no-restart-on-failure \
    --maintenance-policy=TERMINATE \
    --provisioning-model=SPOT \
    --instance-termination-action=STOP \
    --service-account=docker-php-tutorial-deployment@pl-dofroscra-p.iam.gserviceaccount.com \
    --scopes=https://www.googleapis.com/auth/cloud-platform \
    --tags=http-server \
    --create-disk=auto-delete=yes,boot=yes,device-name=dofroscra-test,image=projects/debian-cloud/global/images/debian-11-bullseye-v20220519,mode=rw,size=10,type=projects/pl-dofroscra-p/zones/us-central1-a/diskTypes/pd-balanced \
    --no-shielded-secure-boot \
    --shielded-vtpm \
    --shielded-integrity-monitoring \
    --reservation-affinity=any
Created [https://www.googleapis.com/compute/v1/projects/pl-dofroscra-p/zones/us-central1-a/instances/dofroscra-test-1].

NAME            ZONE           MACHINE_TYPE  PREEMPTIBLE  INTERNAL_IP  EXTERNAL_IP     STATUS
dofroscra-test  us-central1-a  e2-small      true         10.128.0.2   34.122.227.169  RUNNING
Provisioning
For provisioning, we need to install docker and
authenticate the root user to pull images from our registry.
We've already created an installation script at .infrastructure/scripts/provision.sh and the
easiest way to run it on the VM is to transmit it via scp
gcloud compute scp --zone us-central1-a --tunnel-through-iap --project=pl-dofroscra-p ./.infrastructure/scripts/provision.sh dofroscra-test:provision.sh
$ gcloud compute scp --zone us-central1-a --tunnel-through-iap --project=pl-dofroscra-p ./.infrastructure/scripts/provision.sh dofroscra-test:provision.sh
provision.sh              | 0 kB |   0.7 kB/s | ETA: 00:00:00 | 100%
The previous command transmitted the script in the home directory of the user, and we can now execute it via
gcloud compute ssh dofroscra-test --zone us-central1-a --tunnel-through-iap --project=pl-dofroscra-p --command="bash provision.sh"
$ gcloud compute ssh dofroscra-test --zone us-central1-a --tunnel-through-iap --project=pl-dofroscra-p --command="bash provision.sh"
Hit:1 https://download.docker.com/linux/debian bullseye InRelease
Hit:2 http://packages.cloud.google.com/apt cloud-sdk-bullseye InRelease
# ...
The following additional packages will be installed:
  dbus-user-session docker-ce-rootless-extras docker-scan-plugin git git-man
  libcurl3-gnutls liberror-perl libgdbm-compat4 libltdl7 libperl5.32 libslirp0
  patch perl perl-modules-5.32 pigz slirp4netns
Suggested packages:
  aufs-tools cgroupfs-mount | cgroup-lite git-daemon-run | git-daemon-sysvinit
  git-doc git-el git-email git-gui gitk gitweb git-cvs git-mediawiki git-svn
  ed diffutils-doc perl-doc libterm-readline-gnu-perl
  | libterm-readline-perl-perl make libtap-harness-archive-perl
The following NEW packages will be installed:
  containerd.io dbus-user-session docker-ce docker-ce-cli
  docker-ce-rootless-extras docker-compose-plugin docker-scan-plugin git
  git-man libcurl3-gnutls liberror-perl libgdbm-compat4 libltdl7 libperl5.32
  libslirp0 patch perl perl-modules-5.32 pigz slirp4netns
0 upgraded, 20 newly installed, 0 to remove and 6 not upgraded.
Need to get 124 MB of archives.
After this operation, 535 MB of additional disk space will be used.
# ...
Setting up docker-ce (5:20.10.16~3-0~debian-bullseye) ...
Created symlink /etc/systemd/system/multi-user.target.wants/docker.service → /lib/systemd/system/docker.service.
Created symlink /etc/systemd/system/sockets.target.wants/docker.socket → /lib/systemd/system/docker.socket.
Setting up liberror-perl (0.17029-1) ...
Setting up git (1:2.30.2-1) ...
Processing triggers for man-db (2.9.4-2) ...
Processing triggers for libc-bin (2.31-13+deb11u3) ...
Once docker is installed, we can run the authentication of the root user using
sudo su root -c via
gcloud compute ssh dofroscra-test --zone us-central1-a --tunnel-through-iap --project=pl-dofroscra-p --command="sudo su root -c 'gcloud auth configure-docker --quiet'"
$ gcloud compute ssh dofroscra-test --zone us-central1-a --tunnel-through-iap --project=pl-dofroscra-p --command="sudo su root -c 'gcloud auth configure-docker --quiet'"
Adding credentials for all GCR repositories.
WARNING: A long list of credential helpers may cause delays running 'docker build'. We recommend passing the registry name to configure only the registry you are using.
gcloud credential helpers already registered correctly.
Deployment
We're almost done - the last step in the process consists of
building the docker image locally using the correct tag
gcr.io/pl-dofroscra-p/my-nginxdocker build -t "gcr.io/pl-dofroscra-p/my-nginx" -f - . <<EOF FROM nginx:1.21.5-alpine RUN echo "Hello world" >> /usr/share/nginx/html/hello.html EOF$ docker build -t "gcr.io/pl-dofroscra-p/my-nginx" --no-cache -f - . <<EOF FROM nginx:1.21.5-alpine RUN echo "Hello world" >> /usr/share/nginx/html/hello.html EOF #1 [internal] load build definition from Dockerfile #1 sha256:21ee68236cc00e4d1638480de32fd6304d796e6a72306082d3164e9164073843 #... #5 [2/2] RUN echo "Hello world" >> /usr/share/nginx/html/hello.html #5 sha256:72dee3f3637a6b78ff7e50591e3e9108e2b93eee09443e19890f9cb36b35bdc6 #5 DONE 0.5s #6 exporting to image #6 sha256:e8c613e07b0b7ff33893b694f7759a10d42e180f2b4dc349fb57dc6b71dcab00 #6 exporting layers 0.1s done #6 writing image sha256:d0b23a80ebd7311953eeff3818b58007e8747e531e0128eef820f39105f9f1fe done #6 naming to gcr.io/pl-dofroscra-p/my-nginx done #6 DONE 0.1slocal authentication
cat ./gcp-service-account-key.json | docker login -u _json_key --password-stdin https://gcr.io$ cat ./gcp-service-account-key.json | docker login -u _json_key --password-stdin https://gcr.io Login Succeeded Logging in with your password grants your terminal complete access to your account. For better security, log in with a limited-privilege personal access token. Learn more at https://docs.docker.com/go/access-tokens/-
docker push gcr.io/pl-dofroscra-p/my-nginx
$ docker push gcr.io/pl-dofroscra-p/my-nginx Using default tag: latest The push refers to repository [gcr.io/pl-dofroscra-1/my-nginx] ad4683501621: Preparing # ... ad4683501621: Pushed latest: digest: sha256:680086b3c77e4b895099c0a5f6e713ff79ba0d78e1e1df1bc2546d6f979126e4 size: 1775 - and "deploying it on the VM"
For the last step we will once again use a script that we transmit to the VM:
.infrastructure/scripts/deploy.sh
#!/usr/bin/env bash

usage="Usage: deploy.sh image_name"
[ -z "$1" ] &&  echo "No image_name given! $usage" && exit 1

image_name=$1
container_name=nginx

echo "Pulling '${image_name}' from registry"
sudo docker pull "${image_name}"

echo "Starting container"
sudo docker kill "${container_name}"; sudo docker run --name "${container_name}" -p 80:80 --rm -d "${image_name}"

echo "Getting secret GPG_KEY"
gcloud secrets versions access latest --secret=GPG_KEY >> ./secret.gpg
head ./secret.gpg

echo "Getting secret GPG_PASSWORD"
GPG_PASSWORD=$(gcloud secrets versions access latest --secret=GPG_PASSWORD)
echo $GPG_PASSWORD
The script will pull the image on the VM from the registry
$ sudo docker pull 'gcr.io/pl-dofroscra-p/my-nginx'
Using default tag: latest
latest: Pulling from pl-dofroscra-p/my-nginx
# ...
Digest: sha256:680086b3c77e4b895099c0a5f6e713ff79ba0d78e1e1df1bc2546d6f979126e4
Status: Downloaded newer image for gcr.io/pl-dofroscra-p/my-nginx:latest
gcr.io/pl-dofroscra-p/my-nginx:latest
start a container with the image
$ docker kill "${container_name}"; sudo docker run --name "${container_name}" -p 80:80 --rm -d "${image_name}"
Error response from daemon: Cannot kill container: nginx: No such container: nginx
8ac0cc055041e18d3ce244ded49c82be985e580c2c9f316c6d6ef7c7bf3bc0b5
and finally retrieve the secrets (just to demonstrate that it works)
$ gcloud secrets versions access latest --secret=GPG_KEY >> ./secret.gpg
$ head ./secret.gpg
-----BEGIN PGP PRIVATE KEY BLOCK-----

lQPGBGKA1psBCACq5zYDT587CVZEIWXbUplfAGQZOQJALmzErYpTp0jt+rp4vJhR
U5xahy3pqCq81Cnny5YME50ybB3pW/WcHxWLBDo+he8PKeLbp6wFFjJns+3u4opH
9gFMElyHpzTGiDQYfx/CgY2hKz7GSqpjmnOaKxYvGv0EsbZczyHY1WIN/YFzb0tI
tY7J4zTSH05I+aazRdHyn28QcCRcIT9+4q+5Vk8gz8mmgoqVpyeNgQcqJjcd03iP
WUZd1vZCumOvdG5PZNlc/wPFhqLDmYyLmJ7pt5bWIgty9BjYK8Z2NOdUaekqVEJ+
r29HbzwgFLLE2gd52f07h2y2YgMdWdz4FDxVABEBAAH+BwMC9veBYT2oigXxExLl
7fZKVjw02lEr1NpYd5X1ge9WPU/1qumATJWounzciiETpsYGsbPd9zFRJP4E3JZl
sFSh4p0/kXYTuenYD8wgGkeYyN4lm53IHfqSn2z9JMW5Kz9XEODtKJl8fjcn9Zeb

$ GPG_PASSWORD=$(gcloud secrets versions access latest --secret=GPG_PASSWORD)
$ echo $GPG_PASSWORD
87654321
Bonus: For
retrieving the puplic IP address of the Compute Instance VM
we can use the gcloud compute instances describe $instanceName command:
gcloud compute instances describe dofroscra-test --zone us-central1-a --project=pl-dofroscra-p --format='get(networkInterfaces[0].accessConfigs[0].natIP)'
$ ip=$(gcloud compute instances describe dofroscra-test --zone us-central1-a --project=pl-dofroscra-p --format='get(networkInterfaces[0].accessConfigs[0].natIP)')
$ echo $ip
35.224.250.208
$ curl -s "http://${ip}/hello.html"
Hello world
Putting it all together
Since none of the previous steps requires manual intervention any longer, I have created a
script at .infrastructure/setup-gcp.sh to run everything from
Configure gcloud to use the master service account
to Provisioning:
#!/usr/bin/env bash

usage="Usage: deploy.sh project_id vm_name"
[ -z "$1" ] &&  echo "No project_id given! $usage" && exit 1
[ -z "$2" ] &&  echo "No vm_name given! $usage" && exit 1

GREEN="\033[0;32m"
NO_COLOR="\033[0m"

project_id=$1
vm_name=$2
vm_zone=us-central1-a
master_service_account_key_location=./gcp-master-service-account-key.json
deployment_service_account_id=deployment
deployment_service_account_key_location=./gcp-service-account-key.json
deployment_service_account_mail="${deployment_service_account_id}@${project_id}.iam.gserviceaccount.com"
gpg_secret_key_location=secret-production-protected.gpg.example
gpg_secret_key_password=87654321

printf "${GREEN}Setting up GCP project for${NO_COLOR}\n"
echo "==="
echo "project_id: ${project_id}"
echo "vm_name:    ${vm_name}"

printf "${GREEN}Activating master service account${NO_COLOR}\n"
gcloud auth activate-service-account --key-file="${master_service_account_key_location}" --project="${project_id}"

printf "${GREEN}Enabling APIs${NO_COLOR}\n"
gcloud services enable \
  containerregistry.googleapis.com \
  secretmanager.googleapis.com \
  compute.googleapis.com \
  iam.googleapis.com \
  storage.googleapis.com \
  cloudresourcemanager.googleapis.com

printf "${GREEN}Creating deployment service account with id '${deployment_service_account_id}'${NO_COLOR}\n"
gcloud iam service-accounts create "${deployment_service_account_id}" \
  --description="Used for the deployment application" \
  --display-name="Deployment Account"

printf "${GREEN}Creating JSON key file for deployment service account at ${deployment_service_account_key_location}${NO_COLOR}\n"
gcloud iam service-accounts keys create "${deployment_service_account_key_location}" \
  --iam-account="${deployment_service_account_mail}"

printf "${GREEN}Adding roles for service account${NO_COLOR}\n"
roles="storage.admin secretmanager.admin compute.admin iam.serviceAccountUser iap.tunnelResourceAccessor"

for role in $roles; do
  gcloud projects add-iam-policy-binding "${project_id}" --member=serviceAccount:"${deployment_service_account_mail}" "--role=roles/${role}"
done;

printf "${GREEN}Creating secrets${NO_COLOR}\n"
gcloud secrets create GPG_KEY
echo gcloud secrets versions add GPG_KEY --data-file="${gpg_secret_key_location}"

gcloud secrets create GPG_PASSWORD
echo -n "${gpg_secret_key_password}" | gcloud secrets versions add GPG_PASSWORD --data-file=-

printf "${GREEN}Creating firewall rule to allow HTTP traffic${NO_COLOR}\n"
gcloud compute firewall-rules create default-allow-http --allow tcp:80 --target-tags=http-server

printf "${GREEN}Creating a Compute Instance VM${NO_COLOR}\n"
gcloud compute instances create "${vm_name}" \
    --project="${project_id}" \
    --zone="${vm_zone}" \
    --machine-type=e2-micro \
    --network-interface=network-tier=PREMIUM,subnet=default \
    --no-restart-on-failure \
    --maintenance-policy=TERMINATE \
    --provisioning-model=SPOT \
    --instance-termination-action=STOP \
    --service-account="${deployment_service_account_mail}" \
    --scopes=https://www.googleapis.com/auth/cloud-platform \
    --tags=http-server \
    --create-disk=auto-delete=yes,boot=yes,device-name="${vm_name}",image=projects/debian-cloud/global/images/debian-11-bullseye-v20220519,mode=rw,size=10,type=projects/"${project_id}"/zones/"${vm_zone}"/diskTypes/pd-balanced \
    --no-shielded-secure-boot \
    --shielded-vtpm \
    --shielded-integrity-monitoring \
    --reservation-affinity=any

printf "${GREEN}Activating deployment service account${NO_COLOR}\n"
gcloud auth activate-service-account --key-file="${deployment_service_account_key_location}" --project="${project_id}"

printf "${GREEN}Transferring provisioning script${NO_COLOR}\n"
echo "Waiting 60s for the instance to be fully ready to receive IAP connections"
sleep 60
gcloud compute scp --zone ${vm_zone} --tunnel-through-iap --project=${project_id} ./.infrastructure/scripts/provision.sh ${vm_name}:provision.sh

printf "${GREEN}Executing provisioning script${NO_COLOR}\n"
gcloud compute ssh ${vm_name} --zone ${vm_zone} --tunnel-through-iap --project=${project_id} --command="bash provision.sh"

printf "${GREEN}Authenticating docker via gcloud in the VM${NO_COLOR}\n"
gcloud compute ssh ${vm_name} --zone ${vm_zone} --tunnel-through-iap --project=${project_id} --command="sudo su root -c 'gcloud auth configure-docker --quiet'"

printf "\n\n${GREEN}Provisioning done!${NO_COLOR}\n"
$ bash .infrastructure/setup-gcp.sh pl-dofroscra-p dofroscra-test
Setting up GCP project for
===
project_id: pl-dofroscra-p
vm_name:    dofroscra-test
Activating master service account
Activated service account credentials for: [[email protected]]
Enabling APIs
Operation "operations/acf.p2-305055072470-625a52a9-96a7-4e2f-831e-a76491c8882c" finished successfully.
Creating deployment service account with id 'deployment'
Created service account [deployment].
Creating JSON key file for deployment service account at ./gcp-service-account-key.json
created key [fa74d605f5891a6f875a2663b6beeea425730b5b] of type [json] as [./gcp-service-account-key.json] for [[email protected]]
Adding roles for service account
Updated IAM policy for project [pl-dofroscra-p].
bindings:
# ...
- members:
  - serviceAccount:[email protected]
  role: roles/storage.admin
etag: BwXgw51MPTM=
version: 1
Creating secrets
Created secret [GPG_KEY].
Created version [1] of the secret [GPG_KEY].
Created secret [GPG_PASSWORD].
Created version [1] of the secret [GPG_PASSWORD].
Creating firewall rule to allow HTTP traffic
Creating firewall...
..Created [https://www.googleapis.com/compute/v1/projects/pl-dofroscra-p/global/firewalls/default-allow-http].
done.
Creating a Compute Instance VM
Created [https://www.googleapis.com/compute/v1/projects/pl-dofroscra-p/zones/us-central1-a/instances/dofroscra-test].
NAME        ZONE           MACHINE_TYPE  PREEMPTIBLE  INTERNAL_IP  EXTERNAL_IP    STATUS
dofroscra-test  us-central1-a  e2-micro      true         10.128.0.2   34.70.213.101  RUNNING
Activating deployment service account
Activated service account credentials for: [[email protected]]
Transferring provisioning script
Updating project ssh metadata...
..........................................................................Updated [https://www.googleapis.com/compute/v1/projects/pl-dofroscra-p].
.done.
Waiting for SSH key to propagate.
# ...
provision.sh              | 0 kB |   0.7 kB/s | ETA: 00:00:00 | 100%)
Executing provisioning script
Get:1 http://security.debian.org/debian-security bullseye-security InRelease [44.1 kB]
# ...
Processing triggers for man-db (2.9.4-2) ...
Processing triggers for libc-bin (2.31-13+deb11u3) ...
Authenticating docker via gcloud in the VM
# ...
Adding credentials for all GCR repositories.
WARNING: A long list of credential helpers may cause delays running 'docker build'. We recommend passing the registry name to configure only the registry you are using.
Docker configuration file updated.


Provisioning done!
In addition, I also created a script for the Deployment at
.infrastructure/deploy.sh:
#!/usr/bin/env bash

usage="Usage: deploy.sh project_id vm_name"
[ -z "$1" ] &&  echo "No project_id given! $usage" && exit 1
[ -z "$2" ] &&  echo "No vm_name given! $usage" && exit 1

GREEN="\033[0;32m"
NO_COLOR="\033[0m"

project_id=$1
vm_name=$2
vm_zone=us-central1-a
image_name="gcr.io/${project_id}/nginx:latest"
container_name=nginx
deployment_service_account_key_location=./gcp-service-account-key.json

printf "${GREEN}Building nginx docker image with name '${image_name}'${NO_COLOR}\n"
docker build -t "${image_name}" -f - . <<EOF
FROM nginx:1.21.5-alpine

RUN echo "Hello world" >> /usr/share/nginx/html/hello.html

EOF

printf "${GREEN}Authenticating docker${NO_COLOR}\n"
cat "${deployment_service_account_key_location}" | docker login -u _json_key --password-stdin https://gcr.io

printf "${GREEN}Pushing '${image_name}' to registry${NO_COLOR}\n"
docker push "${image_name}"

printf "${GREEN}Transferring deployment script${NO_COLOR}\n"
gcloud compute scp --zone ${vm_zone} --tunnel-through-iap --project=${project_id} ./.infrastructure/scripts/deploy.sh ${vm_name}:deploy.sh

printf "${GREEN}Executing deployment script${NO_COLOR}\n"
gcloud compute ssh ${vm_name} --zone ${vm_zone} --tunnel-through-iap --project=${project_id} --command="bash deploy.sh '${image_name}'"

printf "${GREEN}Retrieving external IP of the VM${NO_COLOR}\n"
ip_address=$(gcloud compute instances describe ${vm_name} --zone ${vm_zone} --project=${project_id} --format='get(networkInterfaces[0].accessConfigs[0].natIP)')
printf "http://${ip_address}/hello.html\n"

printf "\n\n${GREEN}Deployment done!${NO_COLOR}\n"
$ bash .infrastructure/deploy.sh pl-dofroscra-p dofroscra-test
Building nginx docker image with name 'gcr.io/pl-dofroscra-p/nginx:latest'
#...
#7 writing image sha256:65ff457111599e3f4dd439138b052cff74f10e3332c593178d8288aebb88bb1c done
#7 naming to gcr.io/pl-dofroscra-p/nginx:latest done
#7 DONE 0.0s

Use 'docker scan' to run Snyk tests against images to find vulnerabilities and learn how to fix them
Authenticating docker
Login Succeeded

Logging in with your password grants your terminal complete access to your account.
For better security, log in with a limited-privilege personal access token. Learn more at https://docs.docker.com/go/access-tokens/
Pushing 'gcr.io/pl-dofroscra-p/nginx:latest' to registry
The push refers to repository [gcr.io/pl-dofroscra-p/nginx]
ad4683501621: Preparing
# ...
1c9c1e42aafa: Pushed
latest: digest: sha256:680086b3c77e4b895099c0a5f6e713ff79ba0d78e1e1df1bc2546d6f979126e4 size: 1775
Transferring deployment script
deploy.sh                 | 0 kB |   0.6 kB/s | ETA: 00:00:00 | 100%
Executing deployment script
Pulling 'gcr.io/pl-dofroscra-p/nginx:latest' from registry
latest: Pulling from pl-dofroscra-p/nginx
Digest: sha256:f17a9092051c389abf76d254e4d564dbd7a814eb21e3cc47b667db301aa9b497
# ...
gcr.io/pl-dofroscra-p/nginx:latest
Starting container
nginx
58c0a34ca44c9bec97c991bdc69d2353ed75f4214f221e444da36e195a215c75
Getting secret GPG_KEY
-----BEGIN PGP PRIVATE KEY BLOCK-----

lQPGBGKA1psBCACq5zYDT587CVZEIWXbUplfAGQZOQJALmzErYpTp0jt+rp4vJhR
U5xahy3pqCq81Cnny5YME50ybB3pW/WcHxWLBDo+he8PKeLbp6wFFjJns+3u4opH
9gFMElyHpzTGiDQYfx/CgY2hKz7GSqpjmnOaKxYvGv0EsbZczyHY1WIN/YFzb0tI
tY7J4zTSH05I+aazRdHyn28QcCRcIT9+4q+5Vk8gz8mmgoqVpyeNgQcqJjcd03iP
WUZd1vZCumOvdG5PZNlc/wPFhqLDmYyLmJ7pt5bWIgty9BjYK8Z2NOdUaekqVEJ+
r29HbzwgFLLE2gd52f07h2y2YgMdWdz4FDxVABEBAAH+BwMC9veBYT2oigXxExLl
7fZKVjw02lEr1NpYd5X1ge9WPU/1qumATJWounzciiETpsYGsbPd9zFRJP4E3JZl
sFSh4p0/kXYTuenYD8wgGkeYyN4lm53IHfqSn2z9JMW5Kz9XEODtKJl8fjcn9Zeb
Getting secret GPG_PASSWORD
87654321
Retrieving external IP of the VM
http://34.70.213.101/hello.html


Deployment done!
Cleanup
The easiest way to "cleanup everything" that might create any costs, e.g.
- the docker images stored on Cloud Storage
- the secrets in the Secret Manager
- the VM itself
is to delete the whole project, e.g. via the Settings UI
FYI: GCP projects have 30-day-grace-period during that you can "revert" the deletion.
Wrapping up
Congratulations, you made it! If some things are not completely clear by now, don't hesitate to leave a comment. You should now be familiar enough with GCP to create a Compute Instance VM and configure it to run dockerized applications on it.
In the next part of this tutorial, we will
deploy our dockerized PHP application "to production" on GCP via docker compose.
Please subscribe to the RSS feed or via email to get automatic notifications when this next part comes out :)
Wanna stay in touch?
Since you ended up on this blog, chances are pretty high that you're into Software Development (probably PHP, Laravel, Docker or Google Big Query) and I'm a big fan of feedback and networking.
So - if you'd like to stay in touch, feel free to shoot me an email with a couple of words about yourself and/or connect with me on LinkedIn or Twitter or simply subscribe to my RSS feed or go the crazy route and subscribe via mail and don't forget to leave a comment :)
Subscribe to posts via mail