In this third part we will set up a fresh Laravel installation and configure everything to run it on Vagrant, triggered by PhpStorm. That includes: - install Laravel and Laravel Homestead - configure Vagrant through Homestead - run PHPUnit unit tests via PhpStorm on Vagrant - enable Laravel-specific configurations in PhpStorm
And just as a reminder, the first part is over at Setting up PHP7 with Xdebug 2.4 for PhpStorm, the second at Setting up PhpStorm with Vagrant and Laravel Homestead.
Table of contents
Setting up Laravel
Now that we have the basics covered, you should have got a fairly decent understanding how vagrant and PhpStorm play together. But it's still all a little hacky and doesn't feel "right". In this section I'll make up for that by explaining how I set up a completely fresh installation of Laravel (5.2) and configure it to run on a homestead vagrant box for a "real world development" scenario. For now let's assume, that we have no vagrant box configured (i.e. there is no virtual machine running, yet).
Install laravel/laravel
- Create a new PhpStorm project via
File > New Project...and name it "LaravelExample" - Open the PhpStorm terminal and run
composer create-project laravel/laravel tmp. This will initialize a fresh Laravel installation including dependencies. This isn't optimal, since we're doing this from our local machine and not from within the vagrant box we're using later on. This might be a problem when the local PHP setup is (vastly) different from the one in the vagrant box since the downloaded packages might differ. But on the other hand it's not really a big deal since we can just run composer update once the vagrant box is running (from within the box).
Install laravel/homestead
- Unfortunately, composer cannot create a new project in an existing directory, so we need to copy the contents of "tmp" afterwards into the parent directory "LaravelExample" and delete the "tmp" directory manually.
- Next, make sure the current working directory of the shell is the PhpStorm project folder
- Run
composer require laravel/homestead --dev. The laravel/homestead package gives a more convenient way to deal with the setup of the vagrant homestead box as it enables us to use an easy yaml syntax to define the properties we really need. - Run
vendor/bin/homestead make(if that fails, runvendor/bin/homestead.bat makeinstead), which yields:$ vendor/bin/homestead make Homestead Installed!The command also places aHomestead.yamlfile as well as aVagrantfilein the project directory.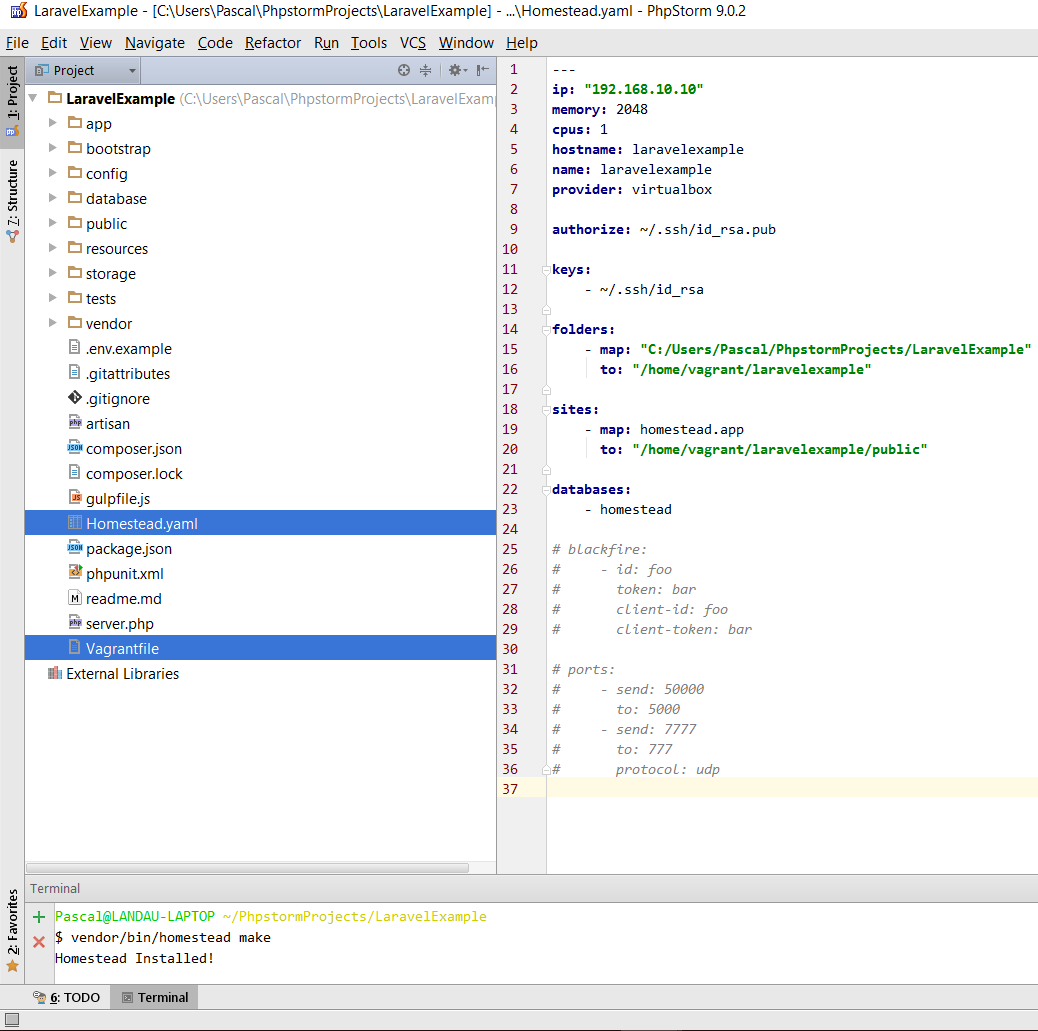 Technically, that would be all you need to do,
because everything is configured to work out of the box (e.g. the configuration of shared folders), but I would like to go over some details
just to make sure it is clear whats going on here.
Technically, that would be all you need to do,
because everything is configured to work out of the box (e.g. the configuration of shared folders), but I would like to go over some details
just to make sure it is clear whats going on here. - Open the
Homestead.yamlfile which should look similar to this: ```
ip: "192.168.10.10" memory: 2048 cpus: 1 hostname: laravelexample name: laravelexample provider: virtualbox
authorize: ~/.ssh/id_rsa.pub
keys: - ~/.ssh/id_rsa
folders: - map: "C:/Users/Pascal/PhpstormProjects/LaravelExample" to: "/home/vagrant/laravelexample"
sites: - map: homestead.app to: "/home/vagrant/laravelexample/public"
databases:
- homestead
There are a few things I would like to adjust:
  - make sure the `ip` (`192.168.10.10` in the example above) is not already used in your local network.
    This is the IP that is assigned to your virtual machine.
  -
folders:
- map: "C:/Users/Pascal/PhpstormProjects/LaravelExample"
to: "/home/vagrant/laravelexample"
- `map` should point to the absolute path to the repository on your **local** (host) machine.
     - `to` denotes the path on your **vagrant** (remote) machine that is mapped to the above mentioned path on your local machine,
       so that you can access your local files within the vagrant box.
  -
sites:
- map: homestead.app
to: "/home/vagrant/laravelexample/public"
- `map: homestead.app` denotes the hostname that the nginx is looking for to serve content on
      you _should_ adjust that entry if you are going to have multiple projects (e.g. to laravelexample.app instead of homestead.app)
      although it not strictly necessary since nginx will respond to other hostnames as well
     - `to: "/home/vagrant/laravelexample/public"` denotes the absolute path within the vagrant box that the above mentioned hostname uses as lookup path for content.
      This should be the path to the `public` folder of the repository on your **vagrant machine**
  - If you already have an SSH key pair that is located in the `.ssh` folder in your home directory, you can leave the following lines in place:
authorize: ~/.ssh/id_rsa.pub
  keys:
      - ~/.ssh/id_rsa
```
Otherwise, you should delete them. They are responsible for a) making it possible to connect
to the box by using your own ssh key and b) letting vagrant use your private key (which might come in handy
if you need to open up an SSH tunnel for example - but that's another story ;))
- Finally, to make your life a little easier, add 192.168.10.10 laravelexample.app and 192.168.10.10 www.laravelexample.app
to the host file on your local machine.
The default location on Windows is C:\Windows\System32\drivers\etc. You will probably need to copy the file
to another location, edit it there and then copy it again to C:\Windows\System32\drivers\etc. The file should look like this:
```
# Copyright (c) 1993-2009 Microsoft Corp.
#
# This is a sample HOSTS file used by Microsoft TCP/IP for Windows.
#
# This file contains the mappings of IP addresses to host names. Each
# entry should be kept on an individual line. The IP address should
# be placed in the first column followed by the corresponding host name.
# The IP address and the host name should be separated by at least one
# space.
#
# Additionally, comments (such as these) may be inserted on individual
# lines or following the machine name denoted by a '#' symbol.
#
# For example:
#
# 102.54.94.97 rhino.acme.com # source server
# 38.25.63.10 x.acme.com # x client host
  # localhost name resolution is handled within DNS itself.
  # 127.0.0.1       localhost
  # ::1             localhost

  192.168.10.10 laravelexample.app
  192.168.10.10 www.laravelexample.app
  ```
  This adjustment makes it possible to open a browser on your host machine and point it to `laravelexample.app`
  or `www.laravelexample.app` which will serve the content of your laravel installation _running within the vagrant box_.
  If there are any issues editing the `host` file, [How-to Geek comes to the rescue. Again.](http://www.howtogeek.com/howto/27350/beginner-geek-how-to-edit-your-hosts-file/)
- Homestead.yaml should now look like this:
```
---
ip: "192.168.10.10"
memory: 2048
cpus: 1
hostname: laravelexample
name: laravelexample
provider: virtualbox
folders:
    - map: "C:/Users/Pascal/PhpstormProjects/LaravelExample"
      to: "/home/vagrant/laravelexample"

sites:
    - map: homestead.app
      to: "/home/vagrant/laravelexample/public"

databases:
    - homestead
```
- Cool, now let's start vagrant via vagrant up.
$ vagrant up
  Bringing machine 'default' up with 'virtualbox' provider...
  ==> default: Importing base box 'laravel/homestead'...
  ==> default: Matching MAC address for NAT networking...
  ==> default: Checking if box 'laravel/homestead' is up to date...
  ==> default: Setting the name of the VM: laravelexample
  ==> default: Fixed port collision for 22 => 2222. Now on port 2200.
  ==> default: Clearing any previously set network interfaces...
  ==> default: Preparing network interfaces based on configuration...
      default: Adapter 1: nat
      default: Adapter 2: hostonly
  ==> default: Forwarding ports...
      default: 80 => 8000 (adapter 1)
      default: 443 => 44300 (adapter 1)
      default: 3306 => 33060 (adapter 1)
      default: 5432 => 54320 (adapter 1)
      default: 22 => 2200 (adapter 1)
  ==> default: Running 'pre-boot' VM customizations...
  ==> default: Booting VM...
  ==> default: Waiting for machine to boot. This may take a few minutes...
      default: SSH address: 127.0.0.1:2200
      default: SSH username: vagrant
      default: SSH auth method: private key
      default: Warning: Connection timeout. Retrying...
      default:
      default: Vagrant insecure key detected. Vagrant will automatically replace
      default: this with a newly generated keypair for better security.
      default:
      default: Inserting generated public key within guest...
      default: Removing insecure key from the guest if it's present...
      default: Key inserted! Disconnecting and reconnecting using new SSH key...
  ==> default: Machine booted and ready!
  ==> default: Checking for guest additions in VM...
  ==> default: Setting hostname...
  ==> default: Configuring and enabling network interfaces...
  ==> default: Mounting shared folders...
      default: /vagrant => C:/Users/Pascal/PhpstormProjects/LaravelExample
      default: /home/vagrant/laravelexample => C:/Users/Pascal/PhpstormProjects/LaravelExample
  ==> default: Running provisioner: shell...
      default: Running: C:/Users/Pascal/AppData/Local/Temp/vagrant-shell20160627-11412-1e33p4n.sh
  ==> default: Running provisioner: shell...
      default: Running: C:/Users/Pascal/AppData/Local/Temp/vagrant-shell20160627-11412-bun3u6.sh
  ==> default: nginx stop/waiting
  ==> default: nginx start/running, process 2202
  ==> default: php7.0-fpm stop/waiting
  ==> default: php7.0-fpm start/running, process 2220
  ==> default: Running provisioner: shell...
      default: Running: C:/Users/Pascal/AppData/Local/Temp/vagrant-shell20160627-11412-8xmse3.sh
  ==> default: mysql:
  ==> default: [Warning] Using a password on the command line interface can be insecure.
  ==> default: Running provisioner: shell...
      default: Running: C:/Users/Pascal/AppData/Local/Temp/vagrant-shell20160627-11412-ct1lb2.sh
  ==> default: createdb: database creation failed: ERROR:  database "homestead" already exists
  ==> default: Running provisioner: shell...
      default: Running: C:/Users/Pascal/AppData/Local/Temp/vagrant-shell20160627-11412-lhjib5.sh
  ==> default: Running provisioner: shell...
      default: Running: inline script
  ==> default: You are running composer with xdebug enabled. This has a major impact on runtime performance. See https://getcomposer.org/xdebug
  ==> default: Updating to version 1.1.3.
  ==> default:     Downloading: Connecting...
  ==> default:
  ==> default:     Downloading: 100%
  ==> default:
  ==> default:
  ==> default: Use composer self-update --rollback to return to version 1.0.0
Please note, that this will create a .vagrant folder in the directory of your laravel app.
- We should now be able to ssh into the virtual machine by using vagrant ssh
```
$ vagrant ssh
Welcome to Ubuntu 14.04.4 LTS (GNU/Linux 3.19.0-25-generic x86_64)
 * Documentation:  https://help.ubuntu.com/
vagrant@laravelexample:~$
- Navigate to the application root directory via `cd /home/vagrant/laravelexample/` which should look like this:
vagrant@laravelexample:~/laravelexample$ cd /home/vagrant/laravelexample/
vagrant@laravelexample:~/laravelexample$ ll
total 157
drwxrwxrwx 1 vagrant vagrant 4096 Jun 26 22:04 ./
drwxr-xr-x 7 vagrant vagrant 4096 Jul 17 13:27 ../
drwxrwxrwx 1 vagrant vagrant 4096 Jun 26 13:40 app/
-rwxrwxrwx 1 vagrant vagrant 1646 Jun 26 13:40 artisan*
drwxrwxrwx 1 vagrant vagrant 0 Jun 26 13:40 bootstrap/
-rwxrwxrwx 1 vagrant vagrant 1309 Jun 26 13:43 composer.json*
-rwxrwxrwx 1 vagrant vagrant 114898 Jun 26 13:44 composer.lock*
drwxrwxrwx 1 vagrant vagrant 4096 Jun 26 13:40 config/
drwxrwxrwx 1 vagrant vagrant 4096 Jun 26 13:40 database/
-rwxrwxrwx 1 vagrant vagrant 423 Jun 26 13:40 .env.example*
-rwxrwxrwx 1 vagrant vagrant 61 Jun 26 13:40 .gitattributes*
-rwxrwxrwx 1 vagrant vagrant 73 Jun 26 13:40 .gitignore*
-rwxrwxrwx 1 vagrant vagrant 503 Jun 26 13:40 gulpfile.js*
-rwxrwxrwx 1 vagrant vagrant 332 Jun 26 22:04 Homestead.yaml*
drwxrwxrwx 1 vagrant vagrant 4096 Jun 26 13:23 .idea/
-rwxrwxrwx 1 vagrant vagrant 212 Jun 26 13:40 package.json*
-rwxrwxrwx 1 vagrant vagrant 1026 Jun 26 13:40 phpunit.xml*
drwxrwxrwx 1 vagrant vagrant 4096 Jun 26 13:40 public/
-rwxrwxrwx 1 vagrant vagrant 1918 Jun 26 13:40 readme.md*
drwxrwxrwx 1 vagrant vagrant 0 Jun 26 13:40 resources/
-rwxrwxrwx 1 vagrant vagrant 567 Jun 26 13:40 server.php*
drwxrwxrwx 1 vagrant vagrant 0 Jun 26 13:40 storage/
drwxrwxrwx 1 vagrant vagrant 0 Jun 26 13:40 tests/
drwxrwxrwx 1 vagrant vagrant 0 Jun 26 21:56 .vagrant/
-rwxrwxrwx 1 vagrant vagrant 900 Jun 26 13:51 Vagrantfile*
drwxrwxrwx 1 vagrant vagrant 4096 Jun 26 13:46 vendor/
```
Before we move on, let's follow the remaining installation instructions in the laravel docs, that is:
- Create a .env file via cp .env.example .env
vagrant@laravelexample:~/laravelexample$ cp .env.example .env
- Generate an application key via php artisan key:generate
vagrant@laravelexample:~/laravelexample$ php artisan key:generate
  Application key [base64:OhVwfzcFp40LaboJyCQAGS1briBwhYDupgvWJD/YYFE=] set successfully.
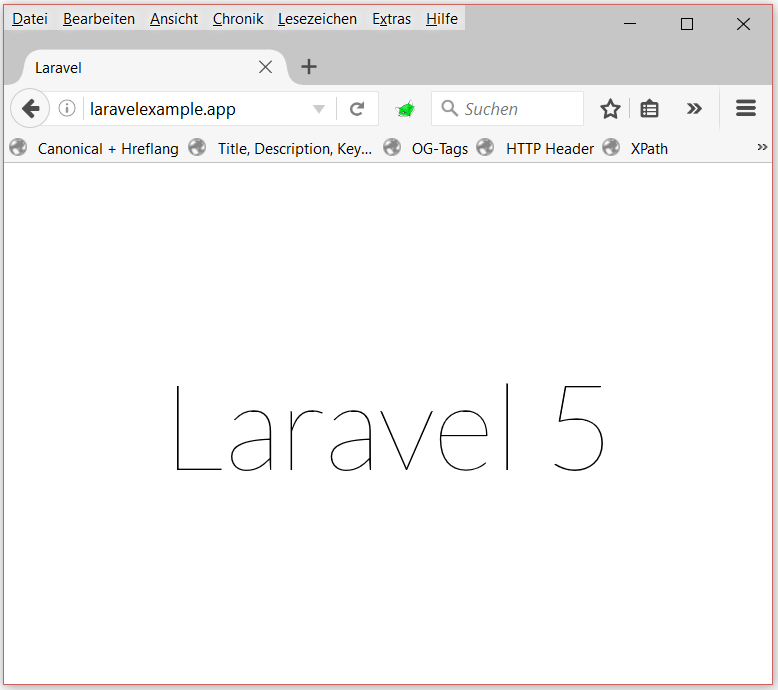
If we did everything right, we should now be able to open a browser and point it to http://laravelexample.app and see the
Laravel welcome screen:
Let's take a step back and think about what we did and what it means:
So we basically set up a new Laravel installation (code-wise) and configured a vagrant homestead box via Laravel Homestead.
And all we need to do to get started, is to navigate into the directory of our app and run vagrant up. Seems not too shabby.
But what if we could make this even more comfortable?
Convenience commands
Since we're using git bash, we can make use of command aliases. This is pretty straight forward:
- Open up a new bash on your host machine
- Type cd ~ to navigate to your home directory
- Type vi .bashrc to open up the vi editor with your .bashrc file (that is basically a configuration file for bash)
- Add an alias like this:
alias aliasname='command'
which makes aliasname available to bash and will execute command.
- After you are finished modifying the file, hit the ESC key and type :wq to save and close vi. Of course, you can also use another editor ;) If you have any problems,
this post might help
- Now you need to either close and open your current bash session or type . ~/.bashrc (which is the same as source ~/.bashrc) to reload the changes
I usually define the following aliases for a new project:
alias ledir='cd "C:\\Users\\Pascal\\PhpstormProjects\\LaravelExample"'
alias leup='ledir && vagrant up'
alias ledown='ledir && vagrant halt'
alias lessh='ledir && vagrant ssh'
alias lein='leup && lessh'
where the le-prefix is just an abbreviation for "LaravelExample" and "C:\\Users\\Pascal\\PhpstormProjects\\LaravelExample" is the directory of the
LaravelExample app on my host machine. So now, all I need to do when I start to work on that project is:
- open a new bash "anywhere"
- type lein
and that will start vagrant for the "LaravelExample" project and ssh into it :)
Configure PhpStorm
Now that we have successfully set up vagrant, it's time to configrue PhpStorm to use the virtual machine. I've explained all the necessary steps to do that in the second part of this series (Setting up PhpStorm with Vagrant and Laravel Homestead) so I'll keep this rather short.
- Make sure your vagrant box is running
- Open the PhpStorm Settings, search for "Deyployment" and choose " "Deployment" under "Build, Execution, Deployment" from the resulting list. Now click on the green "+" at the top left, enter "Vagrant (LaravelExamle)" as name and choose "SFTP" as type.
- In the "Connection" tab, enter the following information:
- SFTP host: laravelexample.app
- Port: 22
- User name: vagrant
- Auth type: Password
- Password: vagrant
- check the "Save password" checkbox
 Please note, that we are connecting directly to the vagrant box using its hostname and port 22 (
laravelexample.appis the host file entry, set we set up earlier.) This is different from the example in the previous article (where we used 127.0.0.1 and the tunneled port 2222) but allows us to easily run multiple vagrant instances simultaneously and identify them via host name.
- Next, open the "Mappings" tab and enter the following information:
- Local path: [path to your local PhpStorm project - this should already be set]
- Deployment path on server 'Vagrant (LaravelExample)': /home/vagrant/laravelexample
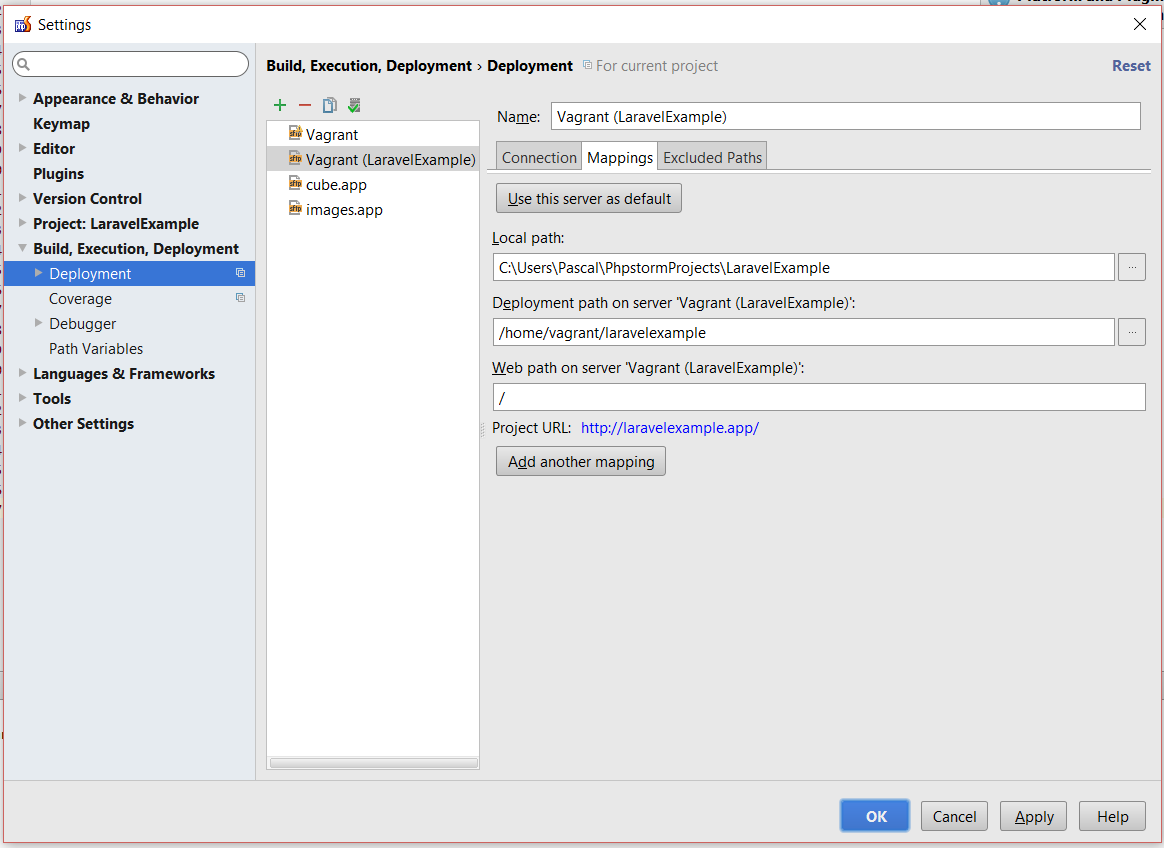 This corresponds to the
 folders:setup that we defined in the Homestead.yml file earlier. Hit "OK" to apply the changes
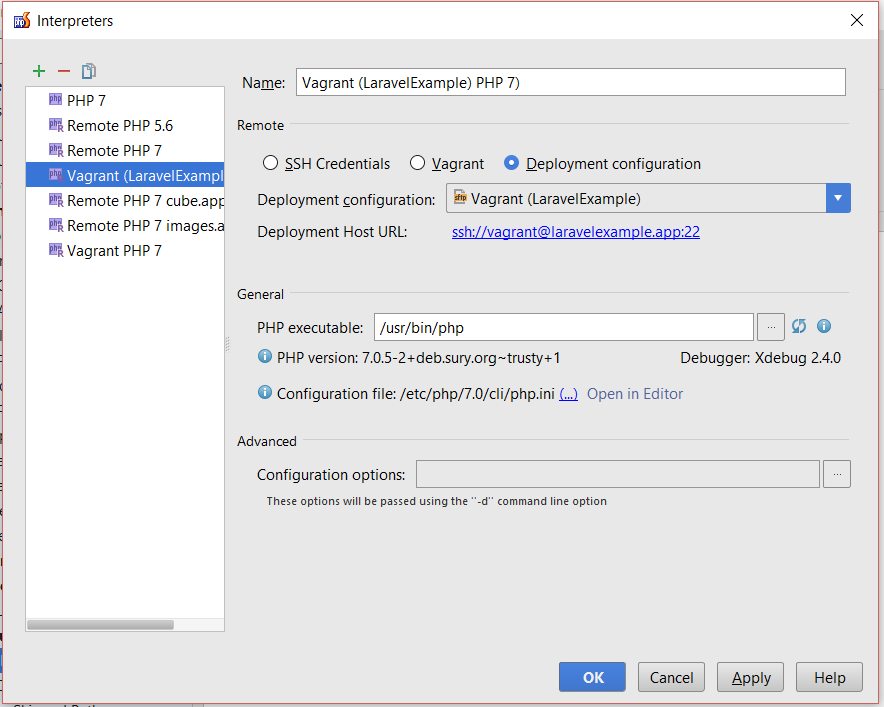
- Open the PhpStorm Settings again, enter the search box at the top left, type "PHP" and choose the entry named "PHP" from the resulting list.
Set the language level to PHP 7 to get the correct syntax highlighting and click on the "..." to open the "Interpreter" dialog.
Click on the "+" in the top left corner and choose "Remote...". In the upcoming dialog choose "Deployment Configuration" and select
the 'Vagrant (LaravelExample)' entry.
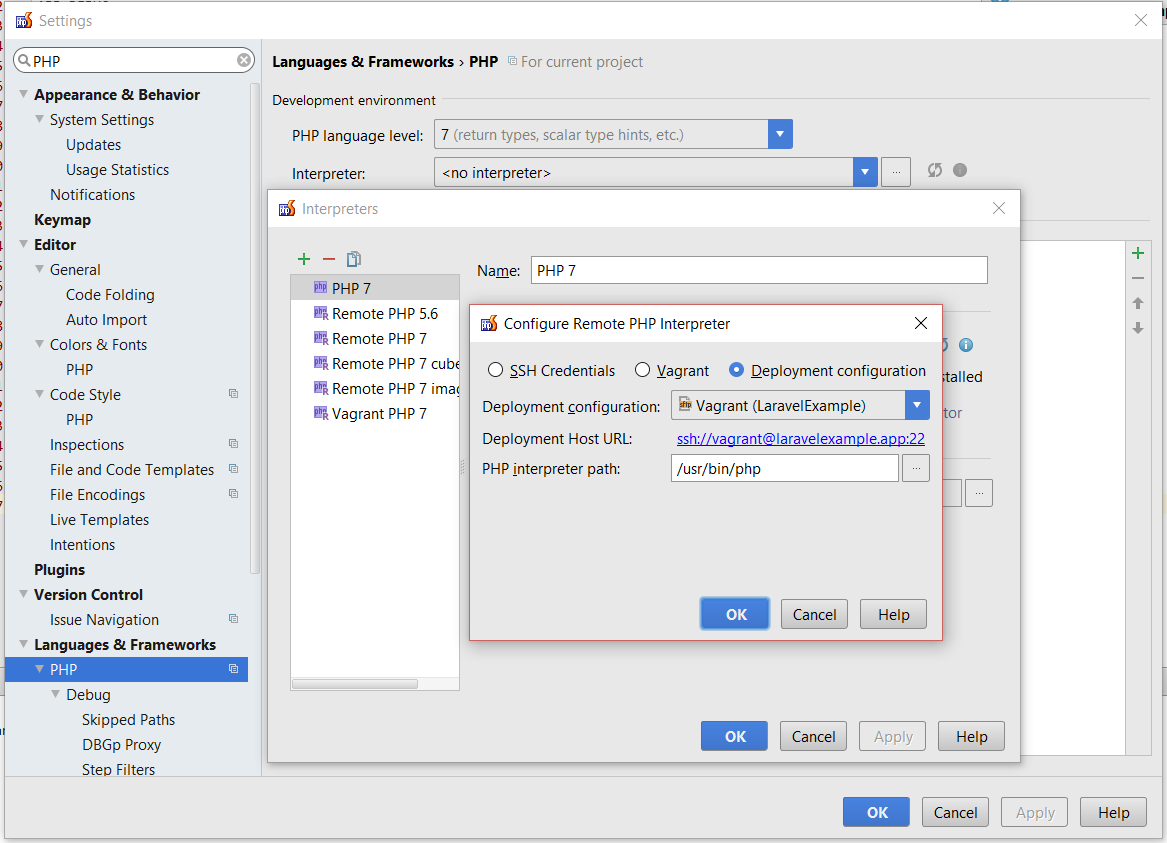
- Hit "OK" to confirm your selection. PhpStorm will now try to connect via SSH on port 22 to
laravelexample.app. Since this is the first time you will be doing that, you should be prompted to confirm the RSA key fingerprint.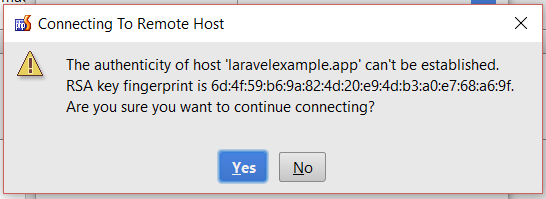 In short,
you need to do this once in the beginning to manually verify that you are really connecting to correct server. Since
we are only using this for local development, it doesn't really matter and you could just confirm the dialog. But that
wouldn't be fun, would it? So, to confirm that the shown RSA key fingerprint matches the one of our vagrant box, log into
the box and type
In short,
you need to do this once in the beginning to manually verify that you are really connecting to correct server. Since
we are only using this for local development, it doesn't really matter and you could just confirm the dialog. But that
wouldn't be fun, would it? So, to confirm that the shown RSA key fingerprint matches the one of our vagrant box, log into
the box and type ssh-keygen -lf /etc/ssh/ssh_host_rsa_key.pub. That should display the same key as shown in the popup:vagrant@laravelexample:~/.ssh$ ssh-keygen -lf /etc/ssh/ssh_host_rsa_key.pub 2048 6d:4f:59:b6:9a:82:4d:20:e9:4d:b3:a0:e7:68:a6:9f root@vagrant (RSA)For more information, please refer to the article Checking ssh public key fingerprints. - Rename the newly created interpreter to "Vagrant (LaravelExample) PHP 7" and confirm the "Interpreters" as well as all remaining
dialogs with "OK".
Great, PhpStorm should now be able to use our homestead vagrant box. To verify that everything is working correctly, you could run the file
artisan in the base folder of your laravel installation. Simply right-click on the file and choose "Run". This should generate something
like this:
sftp://[email protected]:22/usr/bin/php /home/vagrant/laravelexample/artisan
Laravel Framework version 5.2.39

Usage:
  command [options] [arguments]

Options:
  -h, --help            Display this help message
  -q, --quiet           Do not output any message
  -V, --version         Display this application version
      --ansi            Force ANSI output
      --no-ansi         Disable ANSI output
...
The first line sftp://[email protected]:22/usr/bin/php /home/vagrant/laravelexample/artisan confirms, that PhpStorm actually
uses the remote interpreter and the remote path to run.
Setup PHPUnit
Setting up PHPUnit is pretty straight forward.
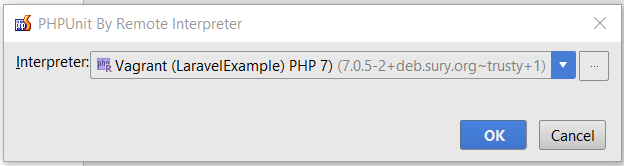
- Open the settings via
File > Settings..., search vor "PHPUnit", choose the entry under "Language & Frameworks" > "PHP" and click on the green "+" in the top left and choose "By Remote Interpreter..."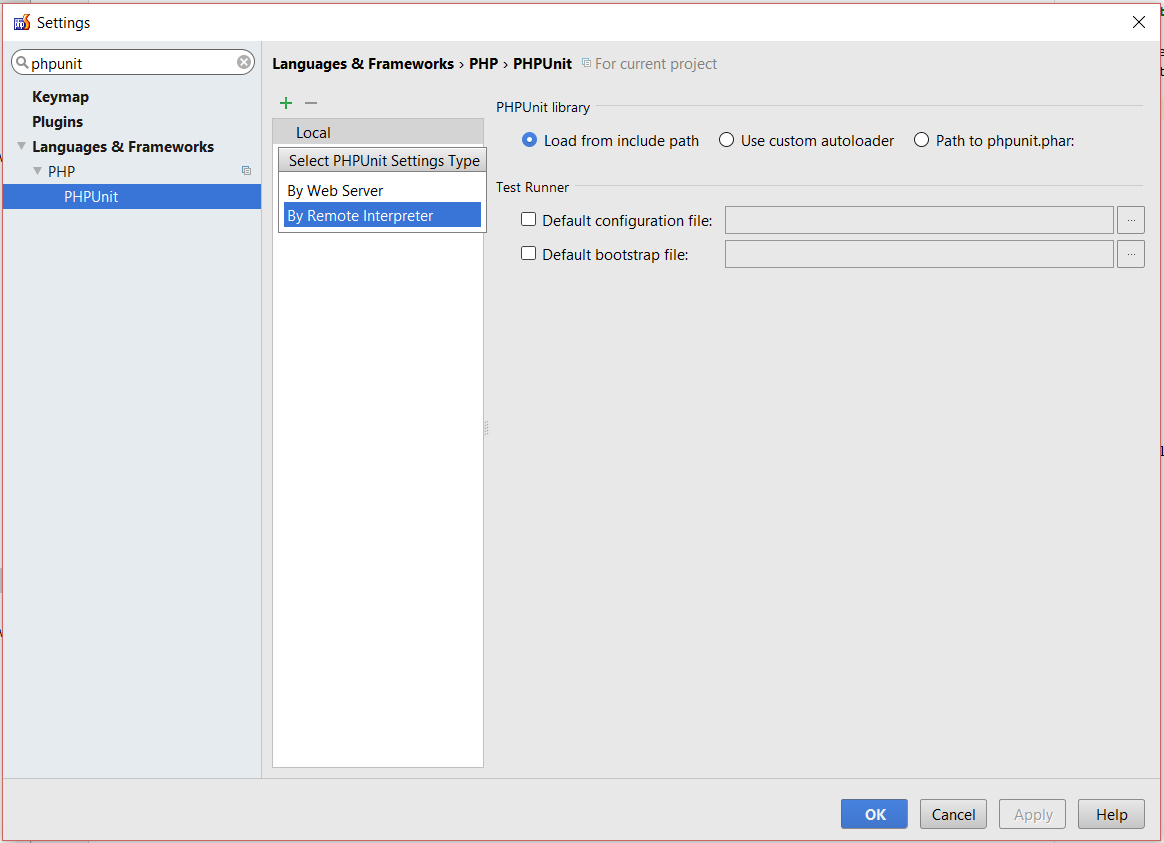
- Choose the "Vagrant (LaravelExample)" entry
- Select "Use custom autoloader" and fill in the required paths (as they appear on the remote server):
- Path to script:
/home/vagrant/laravelexample/vendor/autoload.php(the path to the autoloader as generated by Composer) - Default configuration file:
/home/vagrant/laravelexample/phpunit.xml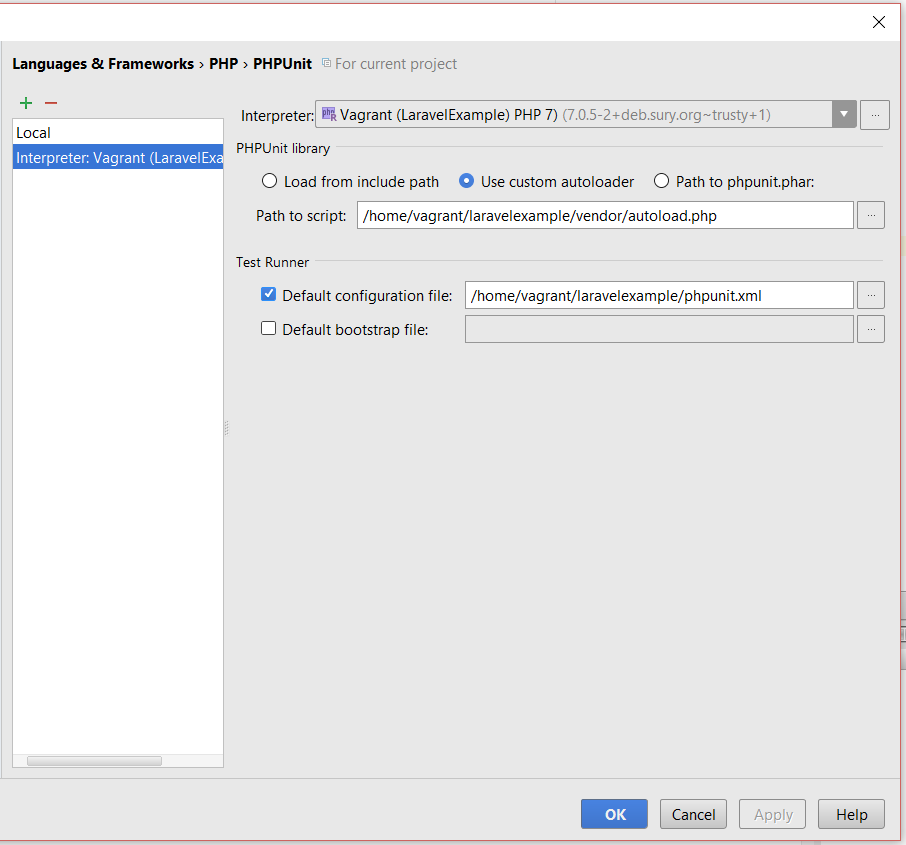
- Path to script:
- Confirm with "OK"
To verify that everything works as expected, right-click on the file "test/ExampleTest.php" in PhpStorm and choose "Run" > "ExampleTest".
 The test should succeed with the following output:

Great, now we can run unit tests from within PhpStorm :) This becomes incredibly useful when tests fail and you need to quickly debug them in
order to find the error. At a later point, you might want to have a look at the <php> section of the phpunit.xml configuration, as that enables
you to override the default settings defined by the ".env" file, which is pretty useful when you want to have specific settings when running unit tests.
I like to setup a dedicated testing database, for instance. To make Laravel use this out of the box, all I need to do is set the corresponding ENV
variable in the phpunit.xml file. Please refer to my comment on Stackoverflow
for some more insight in how .env files work in Laravel.
Laravel-specific settings in PhpStorm
I strongly believe in optimizing the everyday workflow as much as possible. When working with Laravel in PhpStorm, there are two things
that really made my life easier:
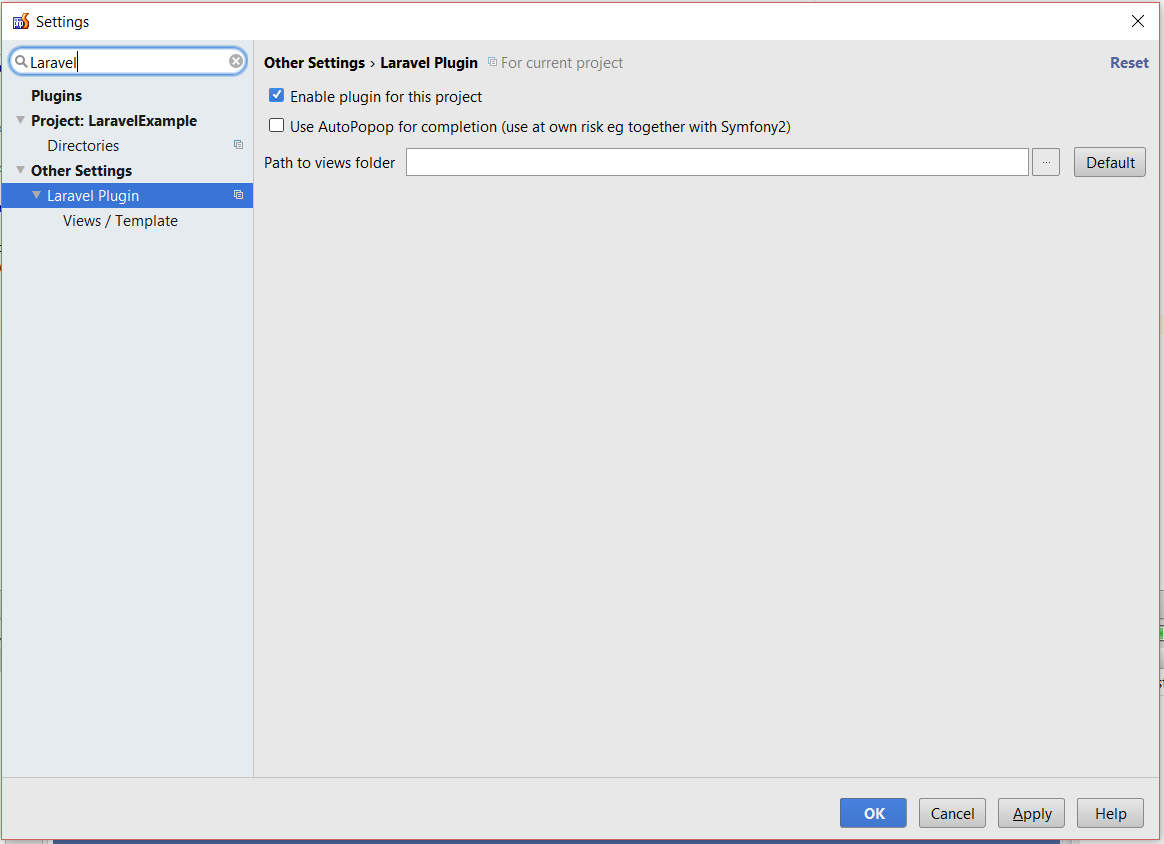
- The Laravel Plugin (Open the settings, search for "plugin" and then for "Laravel Plugin").
I personally really like the code completion when using the config() helper. You can find a full description
at the plugin page and in this blog article.
One thing to note: The plugin has to be activated per project. That means it's not enough to install it, but you
have to enable it in the settings for the current PhpStorm project. Open the settings, search for "Laravel" and choose
the "Laravel Plugin" entry under "Other settings. Now activate the checkbox that says "Enable plugin for this project"
and confirm with "OK".
 - The Laravel IDE helper project by barryvdh.
To install it, log into your vagrant machine and navigate to you project folder. Now run
- The Laravel IDE helper project by barryvdh.
To install it, log into your vagrant machine and navigate to you project folder. Now run
composer require barryvdh/laravel-ide-helper to download the dependency in your vendor folder (and add it to your composer.json)
and add Barryvdh\LaravelIdeHelper\IdeHelperServiceProvider::class to your config/app.php file in the 'providers' => [...] section.
Now generate the helper files for PhpStorm by running two artisan commands:
- php artisan ide-helper:generate
vagrant@laravelexample:~/laravelexample$ php artisan ide-helper:generate
    A new helper file was written to _ide_helper.php
This enables code-completion for Facades, for example. Another nice feature is the
Eloquent meta class that you can use as "meta mixin" for your models. See my comment at issue 74 for a complete example.
- php artisan ide-helper:meta
vagrant@laravelexample:~/laravelexample$ php artisan ide-helper:meta
    A new meta file was written to .phpstorm.meta.php
This enables the automatic recognition of entities, that are resolved from the dependency injection container.
Housekeeping
Our project is setup, it runs on vagrant and we can even run PHPUnit tests. Regarding the local development, we are pretty much all set. But chances are, you're gonna commit your code to some remote repository. (If not, you really should!). To make this as smooth as possible, we should do some cleanup before.
Update the .gitignore file
We added quite some files to the bare Laravel installation which might not be suitable for a remote repository. To prevent them from being
committed, we need to update the .gitignore file in the base directory of the application. The file should currently look like this:
/vendor
/node_modules
/public/storage
Homestead.yaml
Homestead.json
.env
The Homestead.yaml and Homestead.json entries have been added automatically when we ran vendor/bin/homestead make. That's nice, but we
should also add a .vagrant/ entry, because this folder will be created automatically, once we run vagrant up. Further, the ide-helper
Plugin created two files that are only relevant if you're using an IDE so they shouldn't necessarily be in the repo. So let's add entries for
.phpstorm.meta.php and _ide_helper* (I'm using the wildcard here, because there might be more files later with that prefix, e.g. _ide_helper_models.php).
Plus, PhpStorm also generates some meta files itself that really shouldn't be in the repository, so let's add .idea/ as well.
The .gitignore file should now look like this:
/vendor
/node_modules
/public/storage
Homestead.yaml
Homestead.json
.env
.vagrant/
.phpstorm.meta.php
_ide_helper*
.idea/
Update the readme.md file
The readme.md file in the base directory of your application currently contains the default readme of the Laravel framework. So let's delete
the old content and put some general information in there on how other developers can setup their development environment and get started quickly.
Here's an example that you can use as blueprint:
# LaravelExample
## Setup
- download/clone the git repository from
  - `git clone https://github.com/paslandau/laravelexample.git`
- navigate into the project folder
  - `cd laravelexample`
- make sure not to work directly on the master branch
  - `git checkout -b my_local_branch`
- to prepare the vagrant configuration, run
  - `vendor/bin/homestead make` or `vendor/bin/homestead.bat make` on Windows
- adjust the `hosts` file and the newly created `Homestead.yaml` in the root of the repo according to your needs. Usually that includes:
  - adjust `ip`
    - make sure the `ip` is not already used in your local network
  - add an entry to your host file
    - `[IP] laravelexample.app` (e.g. `192.168.33.111 laravelexample.app`)
    - location on Unix: `/etc/hosts`
    - location on Windows: `C:\Windows\System32\drivers\etc`
- adjust `folders` and `sites` mapping (optional; it should be set up correctly by default if you followed the steps above).
  Watch out for the following:
  - the `folders: - map: "[PATH]"` should point to the absolute path to the `cube` repository on your **local** machine
  - the `folders: to: "[PATH]"` denotes the path on your **vagrant** machine that is mapped to the above mentioned path on your local machine,
    so that you can access your local files within the vagrant box.
  - the `sites: - map: "[HOSTNAME]"` denotes the hostname that the nginx is looking for to serve content on
    - you _should_ adjust that to the hostname chosen for your hostfile (e.g. `laravelexample.app`) although it not necessary since nginx will even respond to another hostname
  - the `sites: - to: "[PATH]"` denotes the absolute path withing the vagrant box that the above mentioned hostname uses as `root` path for content.
    This should be the path to the `public` folder of this repository
- start the vagrant box with `vagrant up`, ssh into it with `vagrant ssh`, switch to the project folder (by default, this should be `cd /home/vagrant/laravelexample/`) and install the
  project's dependencies
  - `composer install`
- setup laravel by generating an application key and setting up the .env file:
  - php artisan key:generate
  - `cp .env.example .env`
- generate the meta data files for better code completion
  - `php artisan ide-helper:meta`
  - `php artisan ide-helper:generate`
  - `php artisan ide-helper:model`

You should now be able to open http://laravelexample.app/ in your browser and see the Laravel welcome page :)
Cool, now we are basically done and could upload our project e.g. on Github. I actually went ahead and did exactly that with the "LaravelExample" project I used in this tutorial.
Wanna stay in touch?
Since you ended up on this blog, chances are pretty high that you're into Software Development (probably PHP, Laravel, Docker or Google Big Query) and I'm a big fan of feedback and networking.
So - if you'd like to stay in touch, feel free to shoot me an email with a couple of words about yourself and/or connect with me on LinkedIn or Twitter or simply subscribe to my RSS feed or go the crazy route and subscribe via mail and don't forget to leave a comment :)
Subscribe to posts via mail