In this second part we're going to cover the setup of Vagrant as local development environment. In the end we'll learn how to - install and configure VirtualBox, Vagrant and Laravel Homestead - setup Vagrant in PhpStorm for (remote) PHP execution and debugging
And just as a reminder, the first part is over at Setting up PHP7 with Xdebug 2.4 for PhpStorm, the third at Setting up Laravel with PHPUnit on Vagrant in PhpStorm
Table of contents
Setting up the software
Git and Git Bash
First of all, we're going to install a decent terminal on windows, because we will have to do some stuff on the command line and once you're working with vagrant you'll have to do this via SSH and it's just convenient to have a similar tool set available on Windows as on Unix (e.g. history search).
- Download the current Git version from the Git download page for Windows. Download should start automatically when you open the link.
- Open the file to start the installation
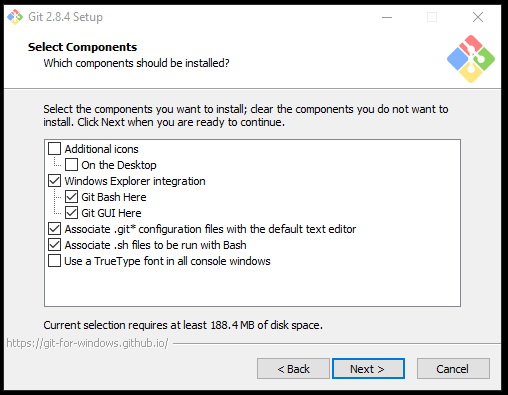
- When you hit the "Select Components" step, make sure the checkbox next to "Git Bash here" is checked. That option enables a new entry in the
context menu when right-clicking in a windows folder to open a Git Bash at this directory.
- During the installation we'll have the convenient opportunity that the installation wizard adjusts our
PATHvariable automatically, so that we can access thegitcommands globally. I prefer to go with the middle option "Use Git from Windows Command Prompt".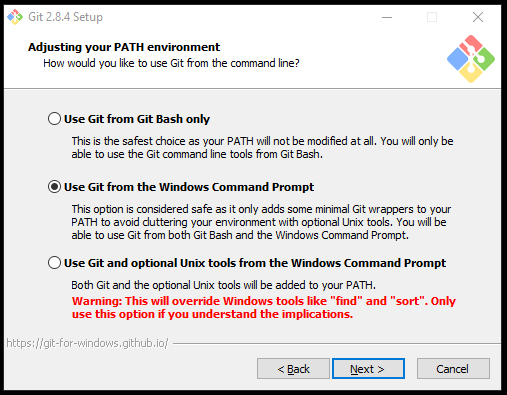
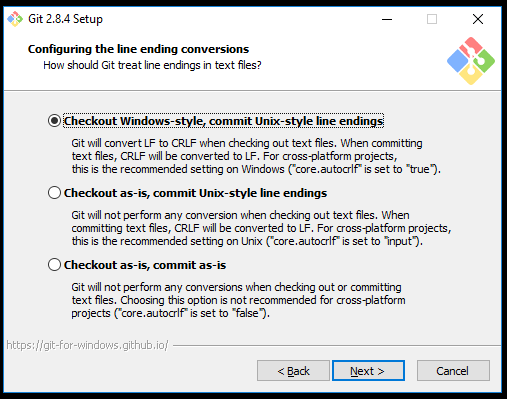
- When being asked for the preferred way to handle line endings, I would advise to go for the middle option again. "Checkout as-is, commit
Unix-style line endings". Since we're using PhpStorm we don't need to have CRLF as line ending - just LF does fine and is cross-plattform
compatible. Just be advised that only LF line endings are not not shown as new lines when using the "normal" windows text editor.
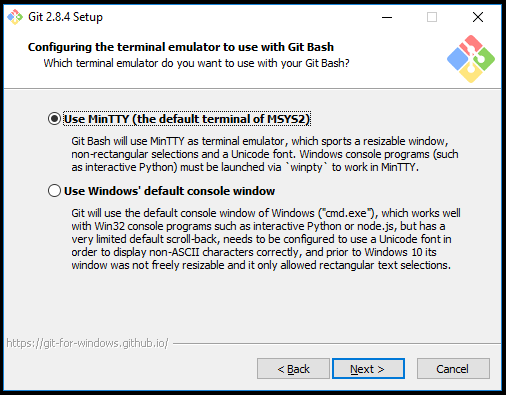
- When being asked for the terminal emulator make sure to choose "Use MinTTY (the default terminal of MYSY2)".
- Confirm the remaining steps with "Next" and finish the installation
- Open a new Git Bash shell and do the most basic setup step:
$ git config --global user.name "John Doe"
$ git config --global user.email [email protected]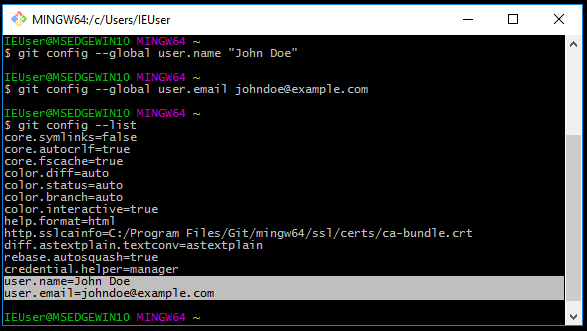
Cool, we now have a much prettier (and more powerful) shell to work with. I won't get any deeper into Git itself as there are much better introductions/tutorials on Git out there than I could possibly write :)
Oracle VirtualBox
VirtualBox is the software that runs the virtual machine that we can use to run our code on. Using a virtual machine makes it possible to use the environment/infrastructure of a production system during local development and thus minimizes the error potential when finally going to production. When you're just starting out, those benefits probably aren't immediately clear to you, but once you begin to design whole systems with multiple components like databases, caches, web servers etc., this approach becomes incredibly helpful.
- Download the latest version of VirtualBox from the VirtualBox download page. As of writing this tutorial, the current version is "VirtualBox 5.0.20 for Windows hosts".
- Run the downloaded file and follow the installation instructions. There's actually nothing to explain ;)
Vagrant
Technically, we wouldn't even need vagrant for our development as the "heavy lifting" is done by VirtualBox and once we've got our virtual machine up and running, we can start running code on it. But getting the setup right is actually not an easy task and requires manual involvement. We don't want that. We want a simple, reproducible, formalized way of defining our virtual machine. Vagrant does exactly that: It gives us a simple configuration language that fulfills those requirements and makes it even sharable with other team members to get them started quickly.
Download the 1.7.4 version of Vagrant from the Vagrant download archive page (the vagrant_1.7.4.msi file is the installer for Windows) As of writing this tutorial, the current version is 1.8.5 but that didn't work for me. (More concrete, I got the error
The box 'laravel/homestead' could not be found
when trying to set up homestead.)
- Run the downloaded file and follow the installation instructions. Again, nothing fancy here but you'll probably need to restart your system after the installation.
Vagrant will automatically be added to the PATH variable, so it can be called globally. To confirm that the
installation was successful, run "vagrant -v", which should yield a similar output to this:
$ vagrant -v
Vagrant 1.7.4
Homestead
Homestead is a vagrant base box that is maintained by the creator of Laravel, Taylor Otwell. There's actually a chapter on Homestead in the Laravel documentation that does a pretty good job explaining how to set homestead up, so I'll keep this section rather short.
Since we've already installed VirtualBox and Vagrant, all we need to do is running vagrant box add laravel/homestead --box-version 0.4.4.
That command will download the homestead box version v0.4.4
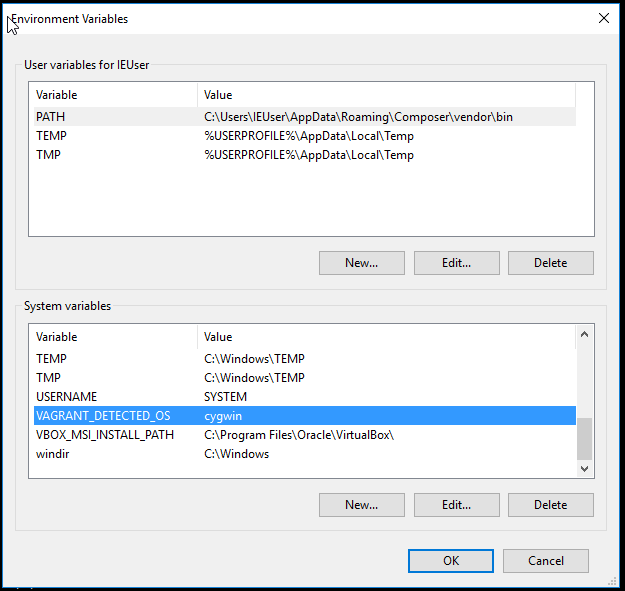
to (by default) ~/.vagrant.d/boxes or in Windows terms C:\Users\<Username>\.vagrant.d\boxes. You can change this location
by setting the VAGRANT_HOME path variable as explained here.
Caution: We specified the concrete version because a simple vagrant box add laravel/homestead would download the
latest version of homestead which is (at the time of this writing) v0.5.0 and contains the newest Ubuntu release 16.04.
If you want to go with that version, make sure to also download and install the latest vagrant version (currently 1.8.5).
It is possible ot have multiple versions of a vagrant box on your host machine, but it requires some additional
setup to choose the right box. Please refer to this answer
for further information.
Note: You might encounter the following error message:
$ vagrant box add laravel/homestead ==> box: Loading metadata for box 'laravel/homestead' box: URL: https://atlas.hashicorp.com/laravel/homestead Vagrant is attempting to interface with the UI in a way that requires a TTY. Most actions in Vagrant that require a TTY have configuration switches to disable this requirement. Please do that or run Vagrant with TTY.
Explanation: The homestead box can work with either VMware or VirtualBox and Vagrant leaves this decision to you. The error indicates that Vagrant doesn't understand which terminal (TTY) you are using and thus cannot display the options for you to choose from.
Solution (as found here): Define the new environment variable
VAGRANT_DETECTED_OS=cygwin.
Open up a new shell and run vagrant box add laravel/homestead again. The output should look like this:
$ vagrant box add laravel/homestead
==> box: Loading metadata for box 'laravel/homestead'
    box: URL: https://atlas.hashicorp.com/laravel/homestead
This box can work with multiple providers! The providers that it
can work with are listed below. Please review the list and choose
the provider you will be working with.

1) virtualbox
2) vmware_desktop

Enter your choice:
Type 1 and press Enter. This might take some time but should in the end look like this:
Enter your choice: 1
==> box: Adding box 'laravel/homestead' (v0.4.4) for provider: virtualbox
    box: Downloading: https://atlas.hashicorp.com/laravel/boxes/homestead/versions/0.4.4/providers/virtualbox.box
    box:
==> box: Successfully added box 'laravel/homestead' (v0.4.4) for 'virtualbox'!
Let's make sure everything works as expected by following these steps:
- create a new directory and cd into it
$ mkdir test && cd test
- Run vagrant init laravel/homestead to create an initial Vagrantfile with our new homestead box as base in the test directory
$ vagrant init laravel/homestead
  A `Vagrantfile` has been placed in this directory. You are now
  ready to `vagrant up` your first virtual environment! Please read
  the comments in the Vagrantfile as well as documentation on
  `vagrantup.com` for more information on using Vagrant.
The Vagrantfile holds the configuration options for the vagrant box, but we don't need to change anything in there for now
(unless you have a device on your network that is occupying the 192.169.10.10 IP address,
which is the default IP that vagrant will assign to the VM)
- Run vagrant up to start the virtual machine
$ vagrant up
  Bringing machine 'default' up with 'virtualbox' provider...
  ==> default: Importing base box 'laravel/homestead'...
  ==> default: Matching MAC address for NAT networking...
  ==> default: Checking if box 'laravel/homestead' is up to date...
  ==> default: Setting the name of the VM: test_default_1466931613297_29944
  ==> default: Clearing any previously set network interfaces...
  ==> default: Preparing network interfaces based on configuration...
      default: Adapter 1: nat
      default: Adapter 2: hostonly
  ==> default: Forwarding ports...
      default: 22 => 2222 (adapter 1)
  ==> default: Booting VM...
  ==> default: Waiting for machine to boot. This may take a few minutes...
      default: SSH address: 127.0.0.1:2222
      default: SSH username: vagrant
      default: SSH auth method: private key
      default: Warning: Remote connection disconnect. Retrying...
Caution: The boot process might get stuck at
default: Warning: Remote connection disconnect. Retrying..
and finally become
```
Timed out while waiting for the machine to boot. This means that
Vagrant was unable to communicate with the guest machine within
the configured ("config.vm.boot_timeout" value) time period.
If you look above, you should be able to see the error(s) that Vagrant had when attempting to connect to the machine. These errors are usually good hints as to what may be wrong.
If you're using a custom box, make sure that networking is properly working and you're able to connect to the machine. It is a common problem that networking isn't setup properly in these boxes. Verify that authentication configurations are also setup properly, as well.
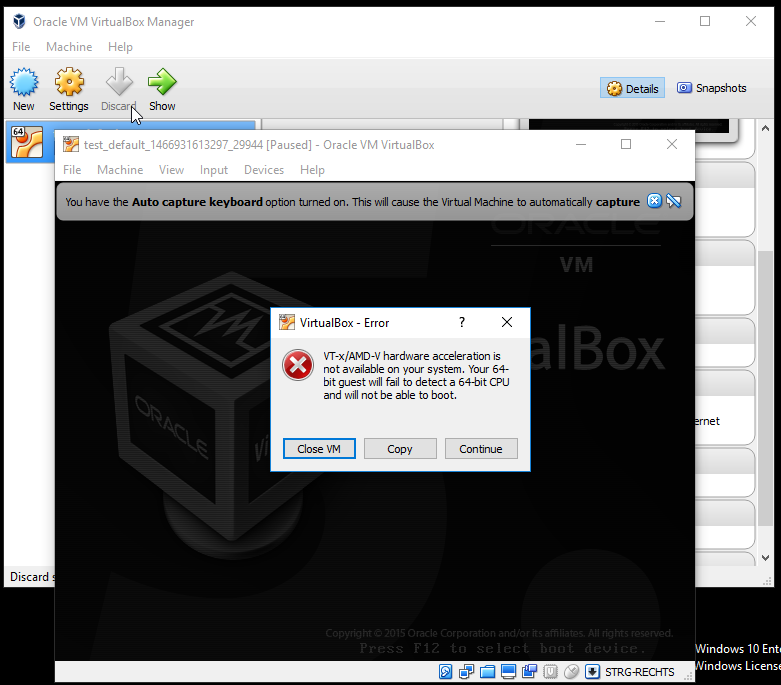
If the box appears to be booting properly, you may want to increase the timeout ("config.vm.boot_timeout") value. ``` Trying to login from the VirtualBox GUI reveals:
VT-x/AMD-V hardware acceleration is not available on your system
 There's actually even a note in the docs:
Note: If you are using Windows, you may need to enable hardware virtualization (VT-x). It can usually be enabled via your BIOS. If you are using Hyper-V on a UEFI system you may additionally need to disable Hyper-V in order to access VT-x.
Please refer to the article How to Enable Intel VT-x in Your Computer’s BIOS or UEFI Firmware
which does a great job explaining exactly how to enable the hardware virtualization. Note: the most easy way for me to get to the BIOS
was simply to hit the WIN key and search for "Advanced Startup" and then clicking on the "Restart now" button. In the upcoming screens I chose
Troubleshoot > Advanced options > UEFI Firmware Settings. If you still have problems to get into the BIOS, read on here
Note: So far, I used my own virtual machine for this tutorial so I could install everything "from scratch" to get the screenshots and a run into the *actual* problems that can occur. Unfortunately, I will now have to switch to my "real" laptop because currently it is not possible to run a 64-bit vagrant box within a virtual machine (yeah, talk about virtualiception ;)). Reason: I can't enable VT-x/AMD-x in the virtual machine. More in depth info on that problem can be found here and here.
- Run
vagrant upagain to start the virtual machine$ vagrant up Bringing machine 'default' up with 'virtualbox' provider... ==> default: Importing base box 'laravel/homestead'... ==> default: Matching MAC address for NAT networking... ==> default: Checking if box 'laravel/homestead' is up to date... ==> default: Setting the name of the VM: test_default_1466937242196_51857 ==> default: Clearing any previously set network interfaces... ==> default: Preparing network interfaces based on configuration... default: Adapter 1: nat ==> default: Forwarding ports... default: 22 => 2222 (adapter 1) ==> default: Booting VM... ==> default: Waiting for machine to boot. This may take a few minutes... default: SSH address: 127.0.0.1:2222 default: SSH username: vagrant default: SSH auth method: private key default: Warning: Connection timeout. Retrying... default: default: Vagrant insecure key detected. Vagrant will automatically replace default: this with a newly generated keypair for better security. default: default: Inserting generated public key within guest... default: Removing insecure key from the guest if it's present... default: Key inserted! Disconnecting and reconnecting using new SSH key... ==> default: Machine booted and ready! ==> default: Checking for guest additions in VM... ==> default: Mounting shared folders... default: /vagrant => C:/Users/Pascal/Desktop/test - SSH into the machine
$ vagrant ssh
You should now see something like this:
Welcome to Ubuntu 14.04.4 LTS (GNU/Linux 3.19.0-25-generic x86_64)

 * Documentation:  https://help.ubuntu.com/
vagrant@homestead:~$
Congratulations, you've successfully overcome every obstacle and are now the proud owner of a working vagrant homestead setup.
Configuring PhpStorm to use the vagrant box
Setting up PhpStorm to work with your newly created vagrant box can be a little tricky, as the process is not really that straight forward. But in the end it's just a matter of "knowing where to click" (and having a little bit of background info on what's happening behind the scenes is also helpful ;)). And it will not work as expected, but I think it's still helpful to explain why that is the case and how to work around it.
PS: There is also a Working with Advanced Vagrant features in PhpStorm tutorial. Although their approach is a little different, so take it as a nice to know :)
- open up PhpStorm and open the settings via
File > Settings... - enter the search box at the top left, type "PHP" and choose the entry named "PHP" under "Laguages & Frameworks" from the resulting list
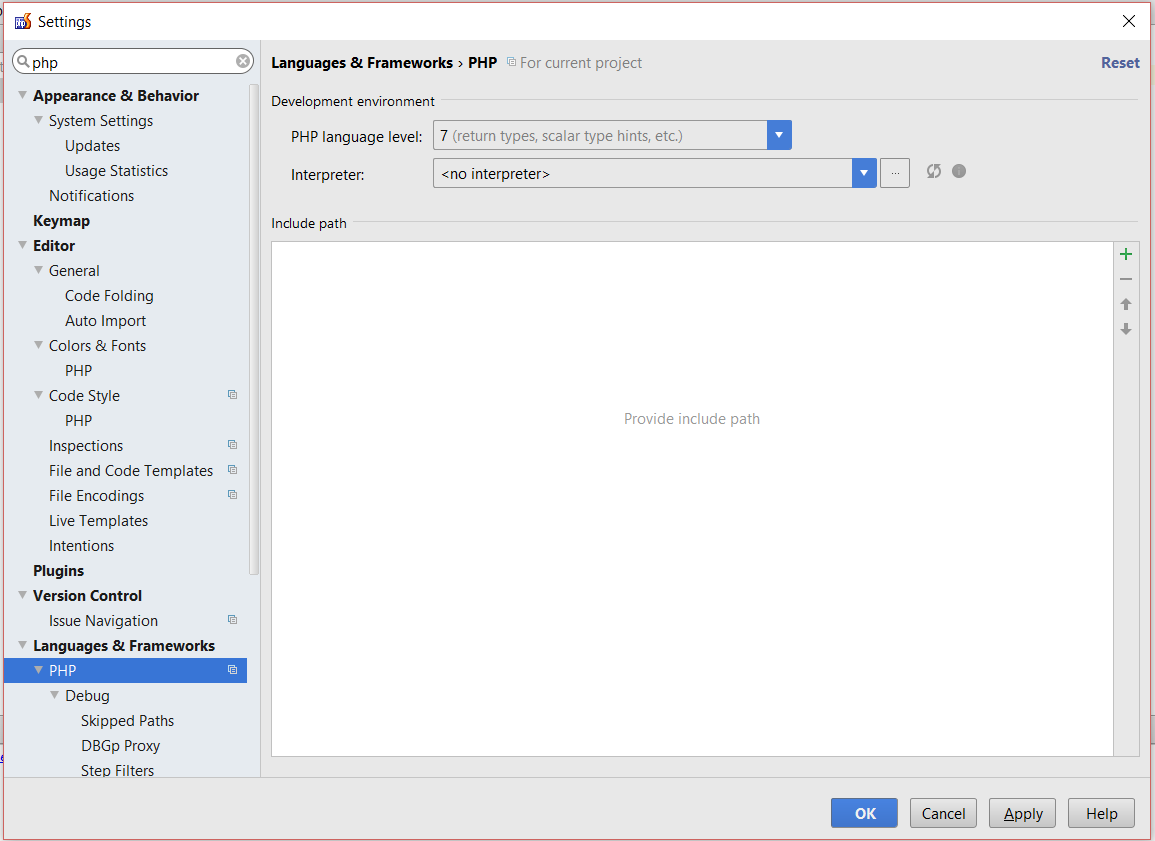
- click on the "..." next to "Interpreter". This opens the interpreter settings for PhpStorm
- click on the green "+" on the top left and choose "Remote..." to add a new interpreter. Technically, vagrant is a "remote" interpreter as we're going to access it via SSH over our local network.
- in the pop up window choose "Vagrant" and select the directory that your "Vagrantfile" is in
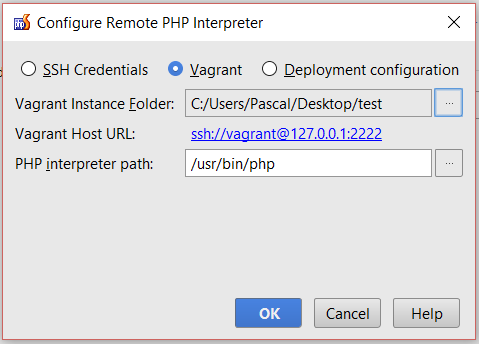 After clicking "OK", PhpStorm will perform some checks (e.g. connect via SSH to vagrant and look for PHP).
 The "Interpreters" window now contains a new entry with the newly generated vagrant remote interpreter.
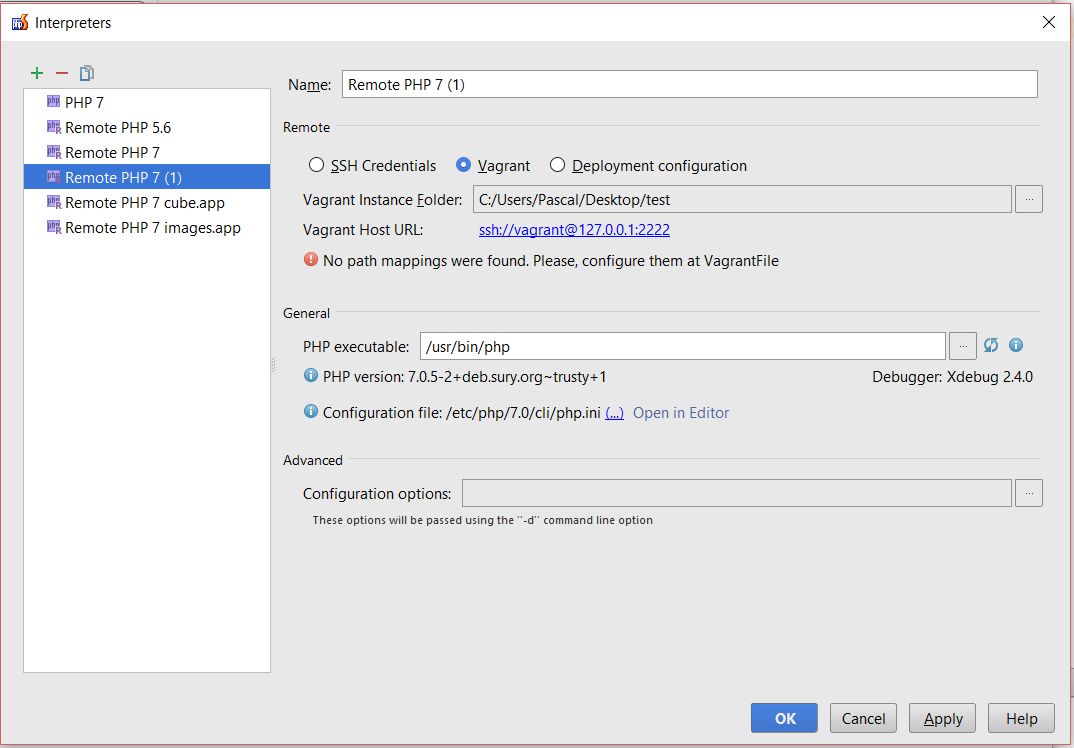 By default, it should be named something like "Remote PHP 7" which I would recommend renaming to "Vagrant PHP 7".
Also note the warning that says
By default, it should be named something like "Remote PHP 7" which I would recommend renaming to "Vagrant PHP 7".
Also note the warning that saysNo path mapping were found. Please, configure them at Vagrantfile
Since we didn't touch the
Vagrantfile, it's true that we didn't configure any path mapping. That means, we did not tell vagrant which folder of our host machine should be made available to the virtual machine. Why do we need this? Well, we're going to execute the source code that we are editing within PhpStorm in the host system in the virtual machine (the remote system), so we need to make it available to the remote system.- Open up your
Vagrantfilein thetestdirectory. There's a lot of stuff in there, but it is mostly commented out and just serves as a blueprint if you need to change the defaults. You can actually delete all of it and replace it with the following content:Vagrant.configure(2) do |config| config.vm.box = "laravel/homestead" config.vm.synced_folder "C:\\Users\\Pascal\\PhpstormProjects\\untitled", "/vagrant_data" endwhereC:\\Users\\Pascal\\PhpstormProjects\\untitledis the path to my PhpStorm project. You can easily get that path if you right-click on the project folder within PhpStorm and selectCopy as pathfrom the context menu. Please make sure to use double\\instead of single\within the path! This makes the project folder on your host machine available to the virtual machine at the directory/vagrant_data - To enable the changes, we need to restart the vagrant box via
vagrant reload. Run the command on your host machine in the directory that holds theVagrantfile. If you are still logged into the virtual machine, press CTRL + D to logout.$ vagrant reload ==> default: Attempting graceful shutdown of VM... ==> default: Checking if box 'laravel/homestead' is up to date... ==> default: Clearing any previously set forwarded ports... ==> default: Clearing any previously set network interfaces... ==> default: Preparing network interfaces based on configuration... default: Adapter 1: nat ==> default: Forwarding ports... default: 22 => 2222 (adapter 1) ==> default: Booting VM... ==> default: Waiting for machine to boot. This may take a few minutes... default: SSH address: 127.0.0.1:2222 default: SSH username: vagrant default: SSH auth method: private key default: Warning: Connection timeout. Retrying... ==> default: Machine booted and ready! ==> default: Checking for guest additions in VM... ==> default: Mounting shared folders... default: /vagrant => C:/Users/Pascal/Desktop/test default: /vagrant_data => C:/Users/Pascal/PhpstormProjects/untitled ==> default: Machine already provisioned. Run `vagrant provision` or use the `--provision` ==> default: flag to force provisioning. Provisioners marked to run always will still run.Please note the linedefault: /vagrant_data => C:/Users/Pascal/PhpstormProjects/untitledwhich tells us that the path mapping is in place. Also, take note of the lines==> default: Forwarding ports... default: 22 => 2222 (adapter 1) ==> default: Booting VM... ==> default: Waiting for machine to boot. This may take a few minutes... default: SSH address: 127.0.0.1:2222That basically means, that the port 22 on the virtual machine is tunneled to port 2222 on the host machine. 2222 is the vagrant default but we could override this setting in the Vagrantfile. Ok, let's get back to the "Interpreters" window in PhpStorm. In case you closed it, just repeat the first steps of this section. But: The warning still isn't gone! That is the part that always through me off in the beginning, because I would have expected PhpStorm to figure the path mappings out automagically. But if we run
test.phpright now, we get the following result:vagrant://C:/Users/Pascal/Desktop/test/usr/bin/php C:\Users\Pascal\PhpstormProjects\untitled\test.php bash: line 0: cd: C:/Users/Pascal/PhpstormProjects/untitled: No such file or directory Could not open input file: C:UsersPascalPhpstormProjectsuntitledtest.php Process finished with exit code 1PhpStorm has no idea where to look within the virtual machine. How can we still get this to work?
- Well, here's how: Enter the search box at the top left, type "Deployment" and choose the entry named "Deployment" from the resulting list.
Now click on the green "+" at the top left, enter "Vagrant" as name and choose "SFTP" as type.
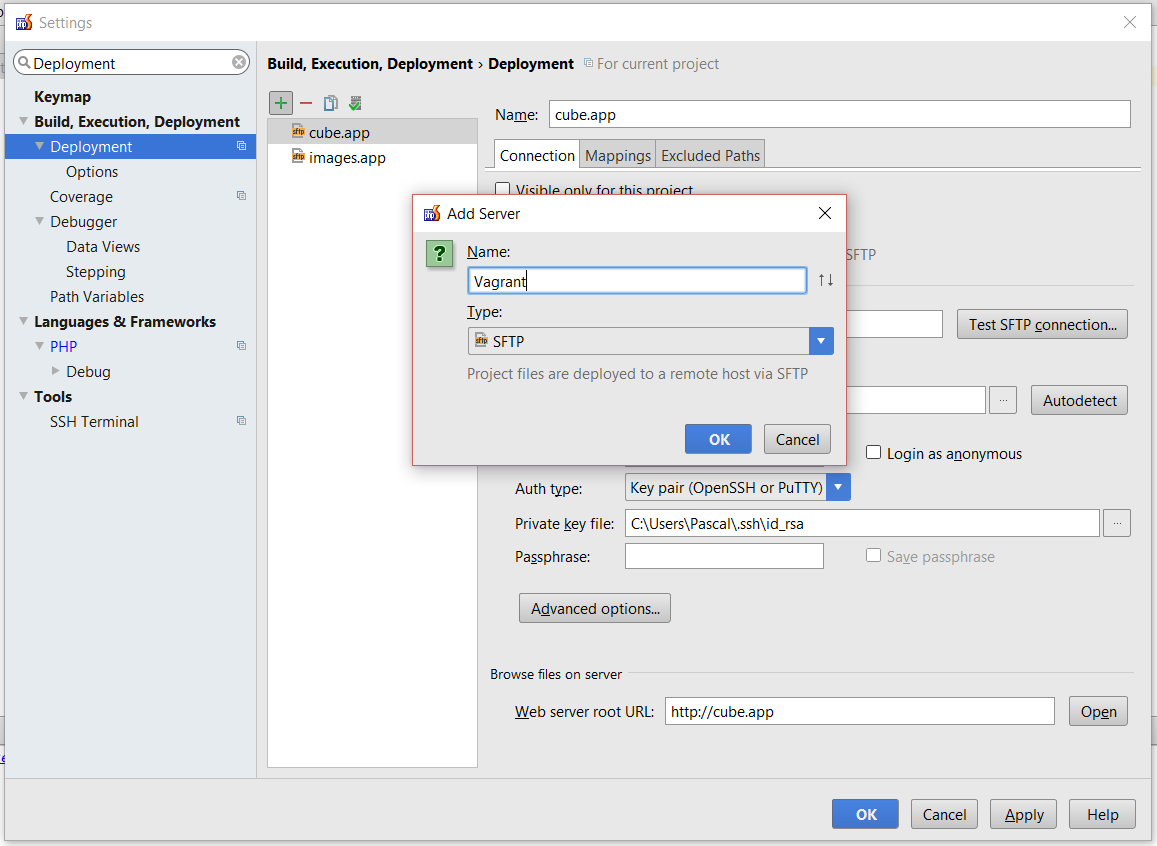 Actually, the name doesn't matter, you can enter what ever you want there ;)
 in the "Connection" tab, enter the following information:
- SFTP host: 127.0.0.1
- Port: 2222
- User name: vagrant
- Auth type: Password
- Password: vagrant
- check the "Save password" checkbox
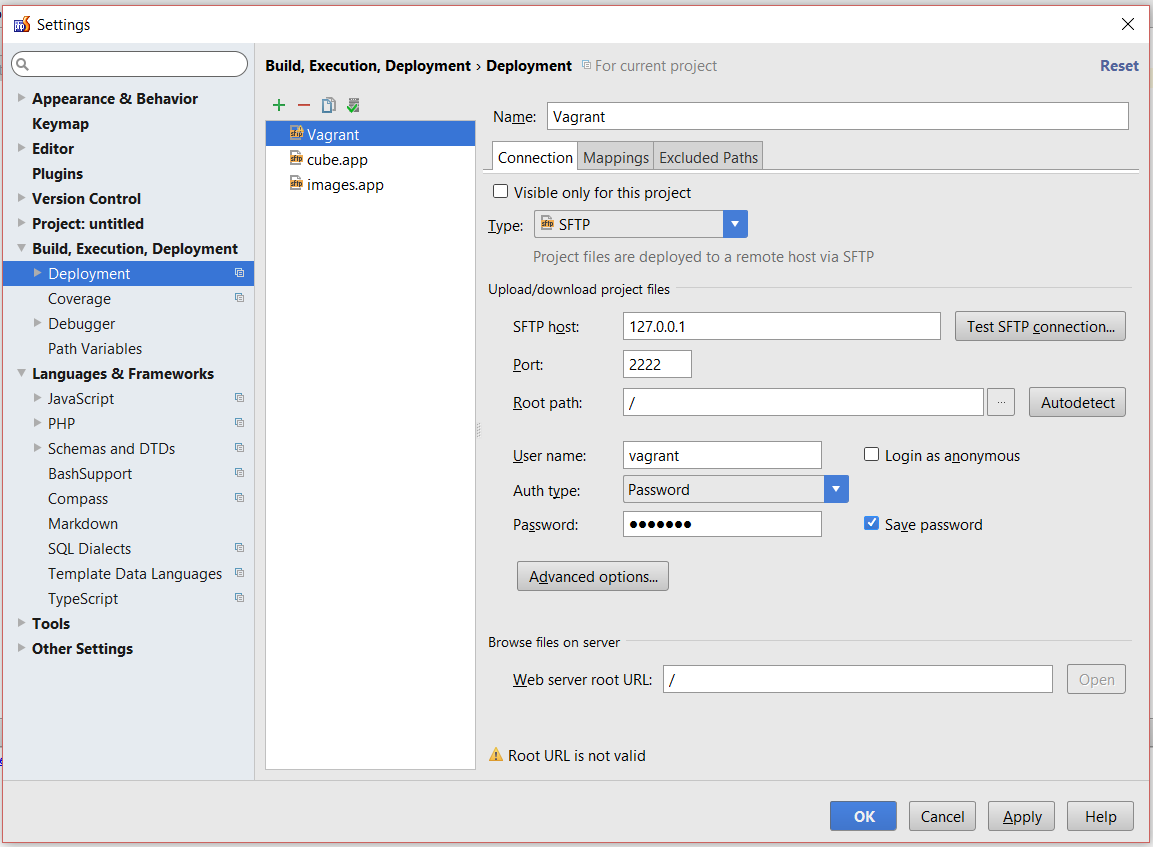 So what does that mean? Those settings tell PhpStorm to connect via SFTP to our vagrant box by using the port 2222 on our host machine -
which tunnels to port 22 on the virtual machine as mentioned above. To do so, it uses the username "vagrant" and the password "vagrant"
for authentication. Again, those credentials are the default values for vagrant (and will be used "behind the scenes" if you use
So what does that mean? Those settings tell PhpStorm to connect via SFTP to our vagrant box by using the port 2222 on our host machine -
which tunnels to port 22 on the virtual machine as mentioned above. To do so, it uses the username "vagrant" and the password "vagrant"
for authentication. Again, those credentials are the default values for vagrant (and will be used "behind the scenes" if you use vagrant sshto ssh into a vagrant machine).Next, open the "Mappings" tab and enter the following information:
- Local path: [path to your local PhpStorm project - this should already be set]
- Deployment path on server 'Vagrant': /vagrant_data
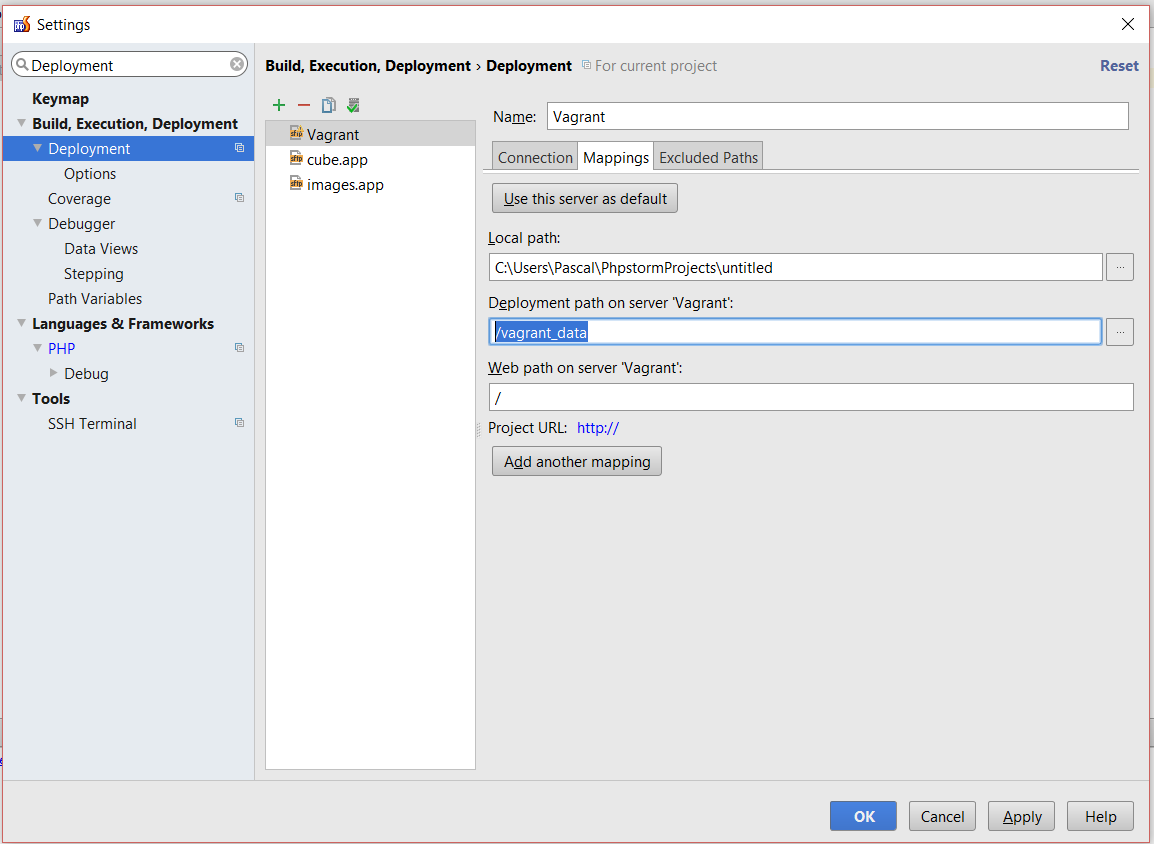 We're basically telling PhpStorm what we told vagrant via the Vagrantfile:
C:/Users/Pascal/PhpstormProjects/untitled(in my case) maps to/vagrant_data- Confirm with "OK" and go back to the "Interpreters" window in PhpStorm. Repeat the first steps of this section to get there.
Choose the remote interpreter we added before but instead of the "Vagrant" radio button, check the "Deployment configuration" radio button.
Choose the "Vagrant" configuration we just created and hit "Apply". There should be no warnings left.
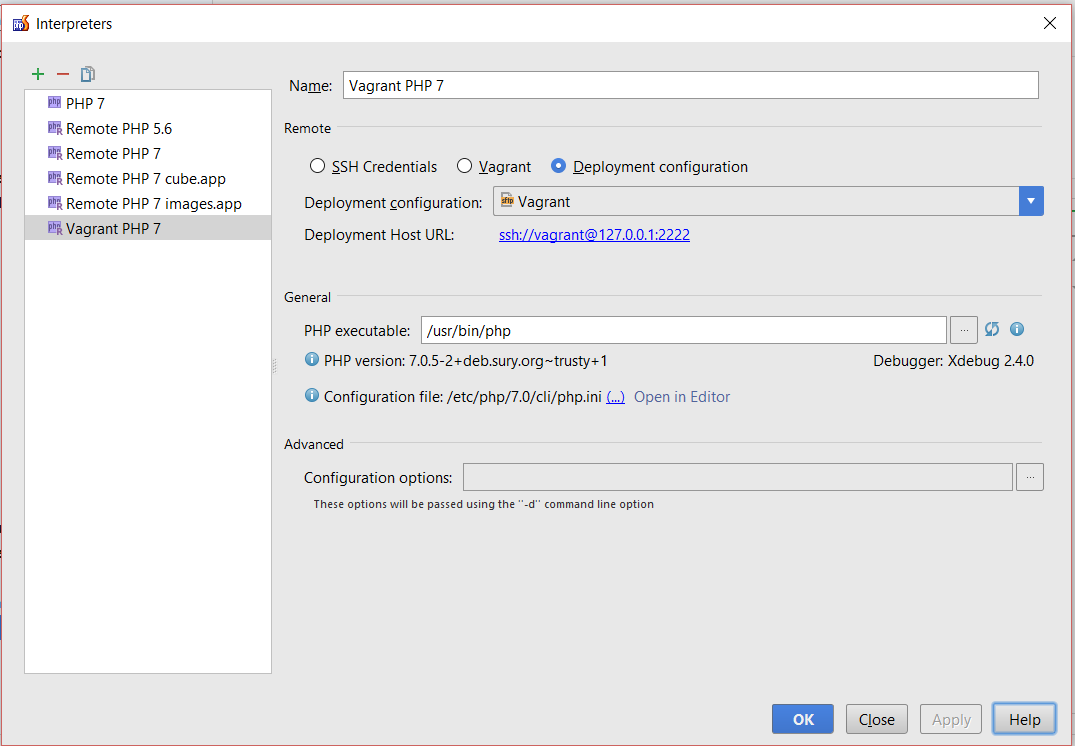
Hit "OK" in all open windows to save the changes we just made and run the "test.php" file. This should generate the following output:
sftp://[email protected]:2222/usr/bin/php /vagrant_data/test.php
1

Process finished with exit code 0
The line
sftp://[email protected]:2222/usr/bin/php /vagrant_data/test.phpverifies, that we are actually using the php interpreter within the vagrant box:- via
sftp:// - with username
vagrant - on
127.0.0.1:2222 - using
/usr/bin/php - to execute
/vagrant_data/test.php
- via
Whoop whoop, that's it :) Oh and because homestead comes pre-installed with Xdebug, we could even set a breakpoint and halt the execution within the virtual
machine - now is that something or what? Before we go on let's shut down the VM by running vagrant halt on the host machine. This will simply shut down
the VM but all changes we made to it stay in place. If you want to make a completely fresh start, use vagrant destroy and confirm that you really want
to "destroy" the VM.
Wanna stay in touch?
Since you ended up on this blog, chances are pretty high that you're into Software Development (probably PHP, Laravel, Docker or Google Big Query) and I'm a big fan of feedback and networking.
So - if you'd like to stay in touch, feel free to shoot me an email with a couple of words about yourself and/or connect with me on LinkedIn or Twitter or simply subscribe to my RSS feed or go the crazy route and subscribe via mail and don't forget to leave a comment :)
Subscribe to posts via mail